Premium Only Content

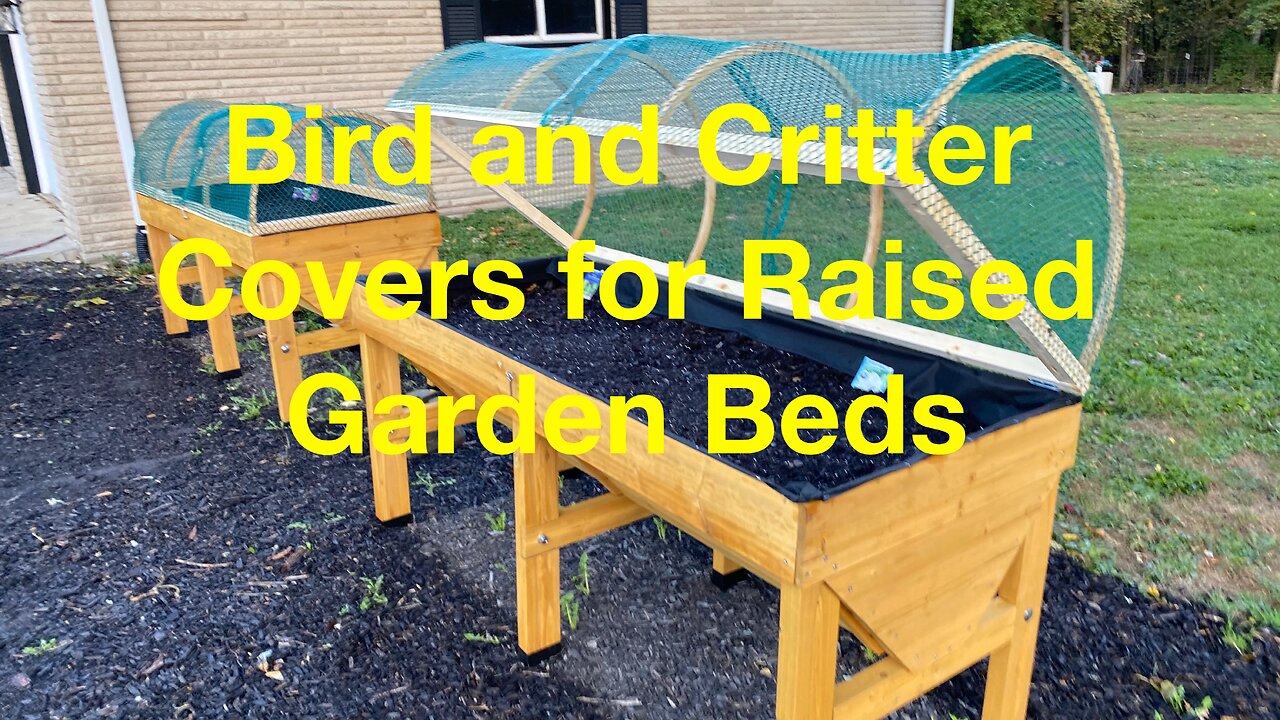
How to Bird-Proof Raised Garden Beds
We purchased some raised garden beds from Home Depot and added covers to keep birds and critters away
Purchased from Home Depot
VegTrug Natural Cedar Raised Bed Planter
Size: 72" x 30" x 32"
Includes landscaping fabric to contain planter mix
Link - https://www.homedepot.com/p/VegTrug-1...
Hoops are 30" x 15", made with mid-grade 3/4" plywood
I used a CNC to cut these out, but a jigsaw would work just fine
The CNC has a 48" x 32" bed and I used every bit of it for these hoops.
I'm using a 1/4" Jenny compression bit to cut the hoops and I really let it work
Jenny line of bits from Cadence Manufacturing and Design - https://www.cadencemfgdesign.com
A compression bit combines the best of the upcut and downcut bit profiles into a single bit. This means it leaves both a clean top and bottom of the material it is cutting.
An additional feature is that it packs the sawdust into the cut as it goes, which helps keep the material in place, requiring less clamps, glue, etc.
I ran the bit at the full depth of the 3/4" plywood, which had me a little nervous
Despite some less than ideal conditions, the compression bit performed perfectly
I didn't secure the plywood to the spoilboard very well, so you hear some chatter and vibration from the plywood and the bit. I have 8 screws securing it to the spoilboard at the corners, but nothing in the middle.
I also learned that I should use 3D tabs, instead of 2D, so the bit isn't causing some momentary puffs of smoke as it drills vertically into the plywood. No real harm done, just recognizing a better approach.
I used an oscillating tool to separate the hoops from the rest of the plywood by cutting through the tabs. I've only used an oscillating too briefly before this and I'm really impressed by how quick it cuts through the tabs. You can see a little onion skin in parts of the hoops, which was likely caused by me measuring the depth of the plywood when it was not properly secured to the spoilboard. The oscillating cutter handled it nicely.
Frames are made from 2 x 2s, joined with Kreg pocket holes. This is a very simple four board layout using butt joints and pocket screws. These will provide enough thickness to screw through the base and secure the hoops.
I attached the 30" x 15" x 3/4" hoops to the 2" x 2"s frames using 2-1/2" wood screws
There was nothing fancy about it, just a pilot hole and wood screw from the bottom of the base into each hoop. If I had not screwed up the camera angle, I'd show you how simple it was, but instead I'm flapping my gums about it.
I used 3/4" plastic poultry netting and stapled it to the hoops. It was a tough call between this and a larger gap metal netting. We'll see how it holds up over time.
I'm using an 18 gauge narrow crown stapler about every 3 inches to keep it attached to the frame and hoops. The narrow crown was a great match for the 3/4" plywood in the hoops.
This was the first time using this tool, so it took a dozen or so staples to get comfortable using it. A few hundred staples later and no blood sacrifices to the wood gods, I was done.
After the netting was secured, I just needed to zip tie the overlapping netting in the center, and add a stainless steel latch and eye hook and some stainless steel hinges.
Stainless steel latch and eye hook to keep hoops closed
Stainless steel hinges to attach frames to bases
Thank you so much for watching and please let me know if you have any questions or comments below.
-
 14:19
14:19
Wind Ridge Wood Crafts
2 months agoCrafting a Hand Plane: Blending Traditional Woodwork with CNC Precision
19 -
 2:41:54
TimcastIRL
10 hours agoMASS SHOOTING At Florida State, Anti Trump Rumors ERUPT, MANGIONE EFFECT w/ Maggie Moda| Timcast IRL
219K125 -
 2:36:29
The Illusion of Consensus
1 day agoExploring Holistic Psychiatry with Dr. Aruna Tammala: Nervous System Regulation, Diet, Supplements, Self-love, and Social Connection
38K1 -
 2:44:57
Laura Loomer
10 hours agoEP115: Democrats' Pet Muslims Bite Back
64.6K28 -
 18:37
18:37
SantaSurfing
13 hours ago4/17/2025 - Trouble for Tish/Google/Jerome! Trump stops a war!
45K20 -
 49:39
49:39
Man in America
18 hours agoThey’re Feeding Us POISON and Calling It Dinner w/ Kim Bright
70.5K19 -
 3:40:07
BrancoFXDC
8 hours ago $3.77 earnedWarzone Rounds - DAY 10 of no Internet
44K3 -
 1:17:17
RiftTV/Slightly Offensive
13 hours ago $13.40 earnedMASSACRE at FSU: Who was Actually RESPONSIBLE? | Slightly Offensive
66.5K18 -
 3:18:46
SilverFox
9 hours ago🔴LIVE - HUGE UPDATE! LORDS OF THE FALLEN 2.0
41K -
 2:03:46
Roseanne Barr
12 hours ago $24.19 earned"God, Go Get em' Honey" W/ Tal Oran | The Roseanne Barr Podcast #95
119K128