Honeywell L5100 ZWAVE: Install to L5210
In this video tutorial we will show you how to install the Honeywell L5100 Z-Wave card into the L5210 control panel.
The Honeywell L5100 ZWAVE card enables your home security system to communicate with Z-Wave enabled lights, locks and sensors. The Z-wave is a sub-gigahertz frequency that uses RF to communicate between devices.
With the Z-Wave enabled you can control your lights, locks and sensors right from the control panel. This will allow you to define scenes, which will run automatic programs. For example you can set a scene to turn on lights, disarm the system and unlock the doors every morning at 8 am.
Our video will show you how to install the Honeywell L5100 ZWAVE card in to the L5100 control panel. Follow along to learn how you can install the card to have a Z-wave enabled home.
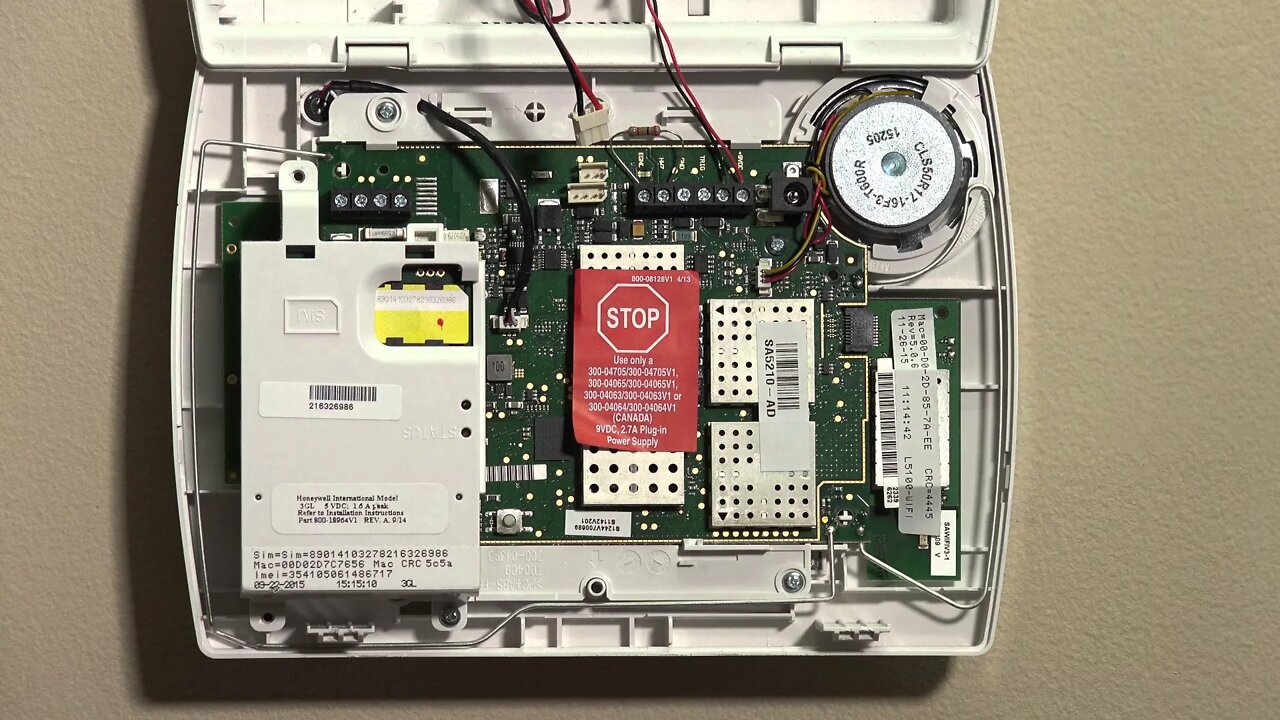
To access the card install slot on the control board, as the video tutorial will show you, there are two tabs on the top of the control panel. Pressing these tabs carefully with a flat head screwdriver will allow the unit to be opened up. Pull the front panel away from the back plate and it will swing down exposing the inside.
In our video we will need to remove the 3GL cellular card, so we will show you these steps as well. The first item is to disconnect the power supply to the unit. Follow along with the video as we show you where the battery pack connects to the control board. Remove the clip from the control board to disconnect the battery power supply. The next step is to remove AC power.
As we discuss in the video, if you have used the LT cable for power you can unplug the LT connector. However, if like in our video, you have the AC power hardwired into the board, you simply need to remove the converter from the AC outlet.
The video will demonstrate how to remove the 3GL cellular device. Remove the three screws and carefully pull the device from the panel. The Z-Wave card will fit to the control board under the 3GL unit.
Follow along with the video to see how to line up the connector pins on the control board to the connector on the Z-Wave card. Press firmly on the card until it seats into position. Installation is the reverse of removal.
Reinstall the 3GL cellular device (if you are equipped) ensuring the pins match up and everything seats correctly. Reattach the battery terminal to the control board as shown in our video and plug the transformer back into the AC outlet.
Follow the video to learn about issues with the pins on the 3GL unit to ensure proper seating.
Close the front plate as the system reboots and your Z-wave card is initialized. You can view our other videos to learn how to enroll Z-Wave devices, how to sync them with the control panel and how to create Z-Wave scenes.
-
 3:39
3:39
Alarm Grid Home Security DIY Videos
1 year agoQolsys IQ Panel 4: Using Dual Path Monitoring
21 -
 LIVE
LIVE
The Quartering
3 hours agoAirplane FLIPS and CRASHES, Sean Duffy Slams Pete Buttigieg, & What Happened with Patriarchy Hannah
3,449 watching -
 56:39
56:39
SLS - Street League Skateboarding
5 days agoHIGHEST SCORING KNOCKOUT ROUND OF ALL TIME! Felipe Gustavo, Dashawn Jordan, Filipe Mota & more...
8 -
 14:26
14:26
Breaking Points
1 day agoWOKE VS BASED?: Saagar And Ryan Play A Game
1.23K3 -
 LIVE
LIVE
SoundBoardLord
5 hours agoThe Red Dead Journey Continues!!!
226 watching -
 LIVE
LIVE
The Officer Tatum
57 minutes agoLIVE: Delta Airlines CRASH BLAMED On Trump, Ashley St. Claire Had Elon's BABY? + More | Ep 63
713 watching -
 1:38:08
vivafrei
3 hours agoAOC goes Full Criminal Lover? Mehdi Hasan Goes Full Terrorist? Another Plane Crash & MORE! Viva Frei
12.9K7 -
 1:52:19
Russell Brand
2 hours agoLIVE FROM MAR A LAGO: US, Russia & China to Negotiate While UK Ramps Up in Ukraine – SF539
69.4K32 -
 1:59:46
The Charlie Kirk Show
2 hours agoThe Biggest Fraud in History? + Russian Peace Talks + Unhappy Boomers? | Gingrich, Rasmussen | 2.18
61.5K20 -
 58:11
58:11
The Dan Bongino Show
5 hours agoThis Is What Winning In Politics Looks Like (Ep. 2425) - 02/18/2025
579K972