2GIG GC3: System Settings
This brief how-to video will discuss the system settings menus on the 2Gig GC3 control panel and what they are used for.
2GIG GC3: http://alrm.gd/2gig-gc3
Get Monitored! http://alrm.gd/get-monitored
The 2Gig GC3 control panel is the latest innovation from Nortek Security. The control panel is more intuitive and user-friendly than the predecessor: 2Gig Go!Control. This video will show you a quick run down of the system settings options on the control panel screen.
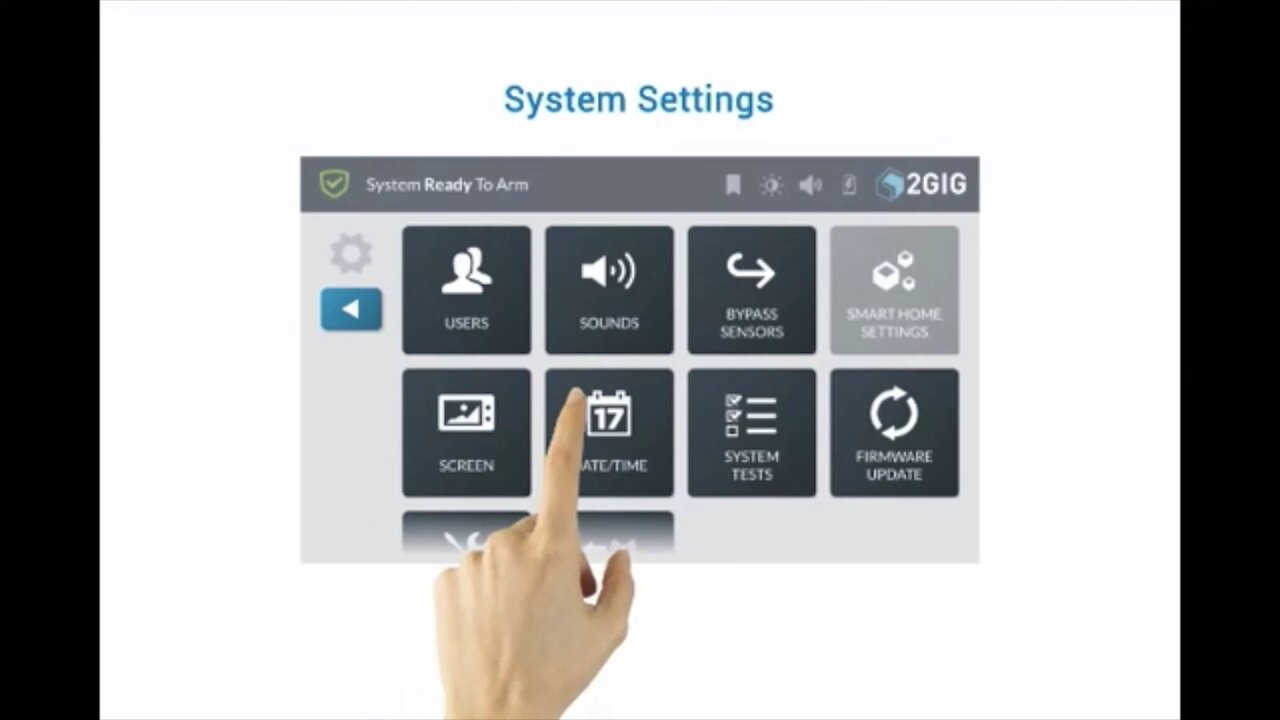
The system settings screen is accessed from the home screen by pressing the system setting button on the bottom right. You will be asked for a user code. As the video will detail entering either the installer code or the master code will grant full access to the system settings.
If you opt to enter a user code instead, you will be given partial access. The video will discuss each to the system setting options.
From the system setting options you can add, name and modify system users. To add a user, follow the video and press the add user button on the top right of the screen.
Here you can name the user and give the user an access code. You can also edit previous users if you need to make a change. For example, if you are using the system in a business and need to change an access code for an employee, you can do so here.
The sound menu will allow you to change the tone and loudness of each of the system tones. This includes the door chimes, keypad press tones and voice and chime sounds. The video will show you how to change these using the sound slider bar inside the menu screen.
The bypass option will allow a user to manually bypass sensors. The walk through video will instruct you on the proper method of bypassing a sensor manually.
You can also change the date and time through the system setting menu. However, as the video will show, if you are using a cellular card or a broadband network connection, the date and time will be set automatically and will not be able to be manually edited.
When you select the System Test menu option, you will be able to test the sensor strength as it is reported to the control panel and that each sensor is being received correctly by the 2Gig GC3 control panel.
With the firmware update option you can utilize the USB port on the control panel to manually update the firmware. If you have manually downloaded a newer version to a USB drive, this menu option will upload and install the new firmware version from your USB into the system.
The video will instruct you to another video to learn all about the toolbox option. This is a detailed run down of each and every option in the user toolbox.
Finally you can press the cell swap option to begin the process of swapping out the cellular module in the control panel.
You can view our other videos about the 2Gig GC3 control panel to learn about the other features and details it provides.
-
 6:05
6:05
Alarm Grid Home Security DIY Videos
1 year agoPROA7 or PROA7PLUS: Using Lyric Sensors
15 -
 19:47
19:47
MTandiZ
3 years agoDJI Action 2 Look @ Settings Interface / Operating System Software MFR # CP.OS.00000197.01
16 -
 6:05
6:05
manikmark
3 years agoSingtrix Karaoke System Review
26 -
 LIVE
LIVE
Alex Zedra
3 hours agoLIVE! Scary Games Girls Night
454 watching -
 LIVE
LIVE
Drew Hernandez
10 hours agoKARMELO ANTHONY FAM BUYS NEW CAR, BIG LETICIA IS SHOOK & EL SALVADOR ILLEGAL IS A WIFE BEATER?
1,963 watching -
 1:15:02
Man in America
9 hours agoTHE GREAT TAKING: They’re Coming for YOUR Assets—the Sinister Plan Exposed w/ James Patrick
24K7 -
 LIVE
LIVE
Amish Zaku
3 hours agoCall in Creations EP# 10 Featuring GamerGril
42 watching -
 1:11:52
Omar Elattar
9 hours agoThe Ex-Marine Millionaire: "How I Turned My $26K in Savings to $70M at 35!"
23.5K1 -
 LIVE
LIVE
I_Came_With_Fire_Podcast
12 hours agoChina Trade War | Driving Miss Perry | German Court
341 watching -
 1:37:07
Glenn Greenwald
5 hours agoAre We Moving Towards War With Iran? PLUS: Zaid Jilani on the El Salvador Deportations and Harvard’s Fight Against Trump | SYSTEM UPDATE #440
99.2K48