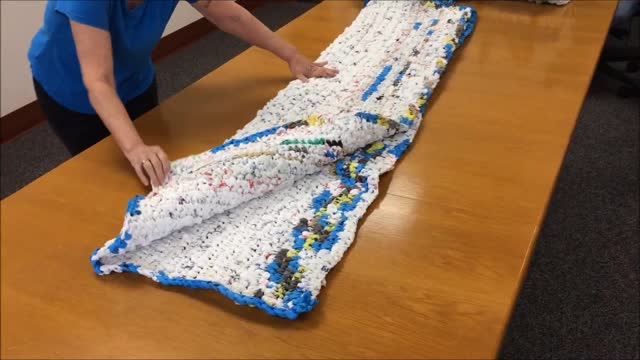
How to Crochet PLARN (PLastic yARN) Sleeping Mats for the Homeless
PLARN Mat Workshop - Sleeping Mats for the Homeless
FIRST STEP: CUT THE LOOPS
1. Smooth the plastic bag on a flat hard surface with handles on your left.
2. Reach over the bag with your left hand to pinch and hold the top just to the right of where you see the handles start.
3. With your right hand, grasp the top right corner of the bag and fold the bag lengthwise towards you, not releasing your hold, with both hands.
4. Cut to the right of where you held the bag with your left hand, thus removing the handles and then snip off the bottom bag seam that you held with your right hand. Discard the handles and bottom seam to recycle.
5. Cut the remaining bag into about 3” loops. This can easily be done by cutting the strip in half, then cutting each half in half, giving you 4 loops for a Food Lion or WalMart type bag.
SECOND STEP: LINK THE LOOPS TO MAKE PLARN BALLS
1. Open 2 loops, one in each hand.
2. Join the loops like making a *rubber band chain* and loosely roll the growing chain into a ball as you continue to add the loops to the chain.
*Pick up two loops and pull one loop part way through the other. Pull end of the second loop through itself, then pull gently until snug. Repeat steps adding to the length of plarn as you roll it into a large ball.
THIRD STEP: CROCHET THE MAT
1. Using a size N metal crochet hook, make a loose chain 6 feet or 3 feet in length, depending if you want to add your crochet rows lengthwise or widthwise.
2. Single crochet back the length of your chain. Crochet one extra loop at the end of the chain for a turning stitch.
3. Turn and single crochet the second row. Continue adding rows until the mat measures 6 feet long and 3 feet wide.
***********************************************************************************
CARRYING STRAP
This is how I make the carrying strap for the 6’ X 3’ (folded lengthwise and
rolled) plarn mat:
1. Chain 12 and slip stitch to join first link to make a circle.
Single stitch every chain around the circle then chain 7 feet and make another 12 chain circle and slip stitch to join.
2. Single stitch around the new circle and when you get back around to the
slip stitch just continue to single crochet along the 7’ length til you’re back to the first circle.
3. To make the carrying strap as wide as desired, just continue to use the
single stitch around the first circle, then single stitch the 7’ length, then
around the 2nd circle, for as many rows as needed. I usually make 3 or 4
rows of single stitches for the width of the carrying strap.
-
 1:05:48
Mikhaila Peterson
5 days agoDoctor On The Carnivore Diet and Fertility | Robert Kiltz EP 218
46.3K22 -
 2:46:06
DDayCobra
9 hours ago $16.27 earnedCobraCast 199
54.8K7 -
 2:07:27
TheSaltyCracker
9 hours agoTrump Tower Bombed w/ Cybertruck ReeEEeE Stream 01-01-25
154K299 -
 8:15:58
FreshandFit
15 hours agoElon Musk BETRAYAL & Mass Censorship On X
203K86 -
 2:25:43
Darkhorse Podcast
16 hours agoLooking Back and Looking Forward: The 258 Evolutionary Lens with Bret Weinstein and Heather Heying
173K211 -
 5:50:16
Pepkilla
15 hours agoRanked Warzone ~ Are we getting to platinum today or waaa
110K7 -
 9:15:09
BrancoFXDC
13 hours ago $9.25 earnedHAPPY NEW YEARS - Road to Platinum - Ranked Warzone
96.4K4 -
 5:53
5:53
SLS - Street League Skateboarding
5 days agoBraden Hoban’s San Diego Roots & Hometown Win | Kona Big Wave “Beyond The Ride” Part 2
102K14 -
 6:03:57
TheBedBug
17 hours ago🔴 LIVE: EPIC CROSSOVER - PATH OF EXILE 2 x MARVEL RIVALS
102K9 -
 1:12:45
The Quartering
15 hours agoTerror In New Orleans, Attacker Unmasked, Tesla BLOWS UP At Trump Tower! Are We Under Attack?
165K267