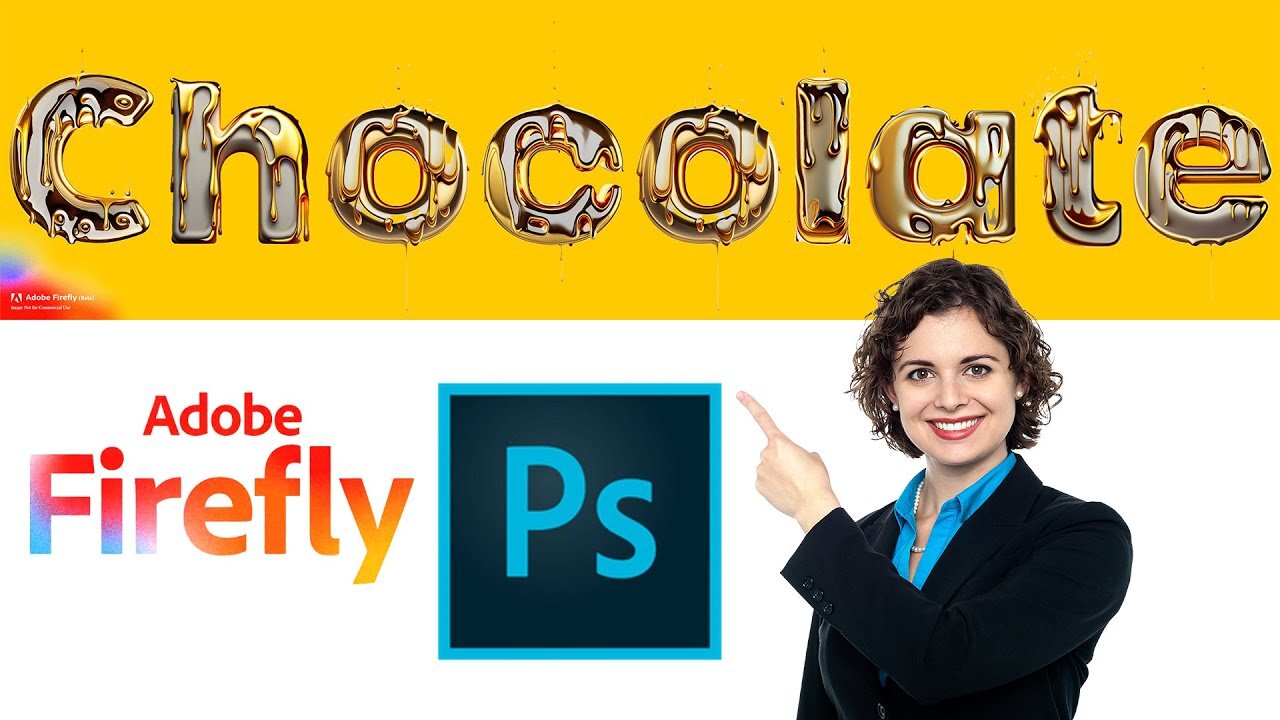
Creating a melting chocolate text effect in Photoshop is a fun and creative way
Creating a melting chocolate text effect in Photoshop is a fun and creative way to enhance your design skills. Here's a step-by-step guide to achieving this effect, along with a suggested video description for your YouTube short:
### Step-by-Step Guide to Creating a Melting Chocolate Text Effect
**1. Create a New Document:**
- Open Photoshop and create a new document with your desired dimensions (e.g., 1920x1080 pixels).
**2. Add Background:**
- Fill the background layer with a chocolate-like color using the Paint Bucket Tool (`G`) or create a new layer and fill it with a gradient that mimics chocolate.
**3. Add Text:**
- Select the Horizontal Type Tool (`T`) and type your desired text. Choose a thick, bold font for the best effect.
- Position the text in the center of the canvas.
**4. Apply Layer Styles:**
- Right-click on the text layer and select **Blending Options**.
- Apply the following styles:
- **Bevel & Emboss:** Set the style to `Inner Bevel`, technique to `Smooth`, depth around `300%`, size to `10px`, soften to `0px`, and adjust the angle to give it a soft shadow.
- **Gradient Overlay:** Use a gradient that resembles chocolate. Adjust the angle and scale to make it look realistic.
- **Drop Shadow:** Apply a subtle shadow to give the text some depth.
**5. Create the Melting Effect:**
- Duplicate the text layer (`Ctrl + J` or `Cmd + J`).
- Convert the duplicate layer to a smart object by right-clicking on the layer and selecting **Convert to Smart Object**.
- Go to **Filter > Liquify** (`Shift + Ctrl + X` or `Shift + Cmd + X`).
- Use the **Forward Warp Tool** to drag parts of the text downward, creating a melting effect. Adjust the brush size as needed.
**6. Enhance the Effect:**
- Add a new layer above the text and use the Brush Tool (`B`) to paint small chocolate drips. Use a soft round brush and sample colors from your text to make it look natural.
- Use the Smudge Tool to refine the drips and blend them into the text.
**7. Final Touches:**
- Adjust the overall color and contrast using adjustment layers like **Brightness/Contrast** or **Hue/Saturation** to match the chocolate theme.
- Add any additional elements, like highlights or sparkles, to enhance the effect.
### YouTube Video Description
"Learn how to create a deliciously realistic melting chocolate text effect in Photoshop! This easy-to-follow tutorial will guide you through the steps to transform your text into mouthwatering chocolate art. Perfect for graphic designers and Photoshop enthusiasts looking to sweeten up their projects. 🍫✨
**🔔 Subscribe for more creative tutorials!**
#Photoshop #ChocolateEffect #GraphicDesign #TextEffect #PhotoshopTutorial #CreativeDesign"
-
 1:00:56
The Tom Renz Show
8 hours agoThe War On DOGE Is ALSO A War On The Economy
18.8K5 -
 1:30:16
Steve-O's Wild Ride! Podcast
5 days ago $1.26 earnedAri Shaffir Exposes The Dark Side of Podcasting - Wild Ride #252
25.8K1 -
 1:56:29
The Quartering
6 hours agoAirplane FLIPS and CRASHES, Sean Duffy Slams Pete Buttigieg, & What Happened with Patriarchy Hannah
78K31 -
 37:08
37:08
Standpoint with Gabe Groisman
23 hours agoDOGE The UK?! With Liz Truss
41.3K12 -
 56:39
56:39
SLS - Street League Skateboarding
6 days agoHIGHEST SCORING KNOCKOUT ROUND OF ALL TIME! Felipe Gustavo, Dashawn Jordan, Filipe Mota & more...
30.6K1 -
 14:26
14:26
Breaking Points
1 day agoWOKE VS BASED?: Saagar And Ryan Play A Game
24.2K6 -
 5:29:58
SoundBoardLord
8 hours agoThe Red Dead Journey Continues!!!
29.2K1 -
 1:17:31
The Officer Tatum
4 hours agoLIVE: Delta Airlines CRASH BLAMED On Trump, Ashley St. Claire Had Elon's BABY? + More | Ep 63
35.7K37 -
 1:38:08
vivafrei
6 hours agoAOC goes Full Criminal Lover? Mehdi Hasan Goes Full Terrorist? Another Plane Crash & MORE! Viva Frei
78.1K37 -
 1:52:19
Russell Brand
6 hours agoLIVE FROM MAR A LAGO: US, Russia & China to Negotiate While UK Ramps Up in Ukraine – SF539
150K52