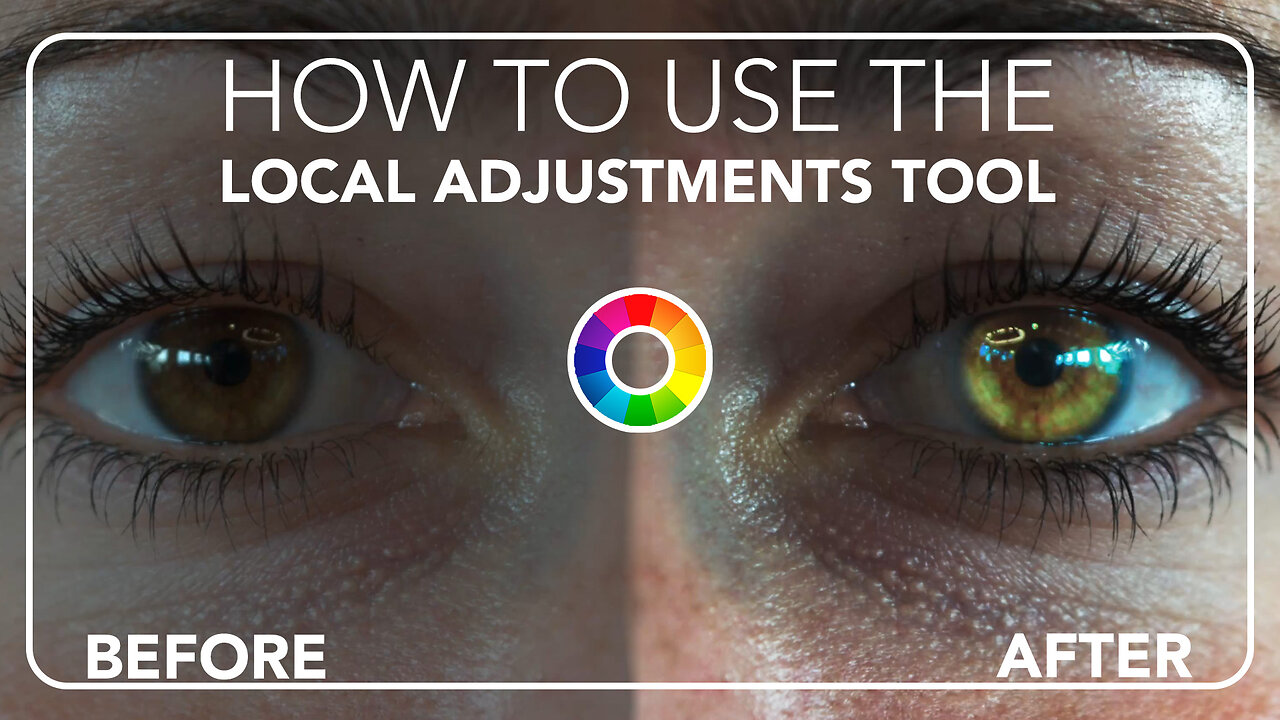
The MOST POWERFUL Tool in Rawtherapee: Local Adjustments!
The Local Adjustments tool is new in Rawtherapee 5.10. It allows the user to add a mask, and then apply adjustment tools within that mask to affect certain user defined parts of the image rather than the entire image. This tutorial covers the basics of this tool and shows you how to use the Local Adjustments tool to change the eye color of your model.
My Gear:
Camera - Sony a7iii: https://amzn.to/3LvokH2
Lens - Meike 50mm f/1.8: https://amzn.to/4cyyZgd
Lens Meike 85mm f/1.8: https://amzn.to/4cENWxt
Lens Filter - K&F Concept: https://amzn.to/3LqCglW
Memory Card - Sandisk 128GB: https://amzn.to/4cYpGpA
Sound Recorder - Zoom: https://amzn.to/4cIn67B
Tripod - Victiv: https://amzn.to/3xZ1GDY
BEST FREE SOFTWARE ON THE NET:
Download Darktable: https://www.darktable.org/
Download Rawtherapee: https://rawtherapee.com/
Download GIMP: https://www.gimp.org/
Download Blender 3D: https://builder.blender.org/download/
Download Krita: https://krita.org/en/
Download Inkscape: https://inkscape.org/
Download LMMS: https://lmms.io/
Download Audacity: https://www.audacityteam.org/
Chapters:
0:00 - Introduction
0:21 - Basic Image Adjustments
0:52 - Adding Clarity with the Tone Curve
2:02 - Introduction to the Local Adjustments Tool
2:15 - Adding a Mask
2:37 - Additional Mask Settings
5:16 - Adding a Tool (Color and Light)
5:46 - Adjusting the Mask Points
6:39 - Transition Gradient Settings
7:46 - Shape Detection Settings
10:01 - Changing the Eye Color
11:29 - Mask Refinement
11:45 - Adding a Denoise Tool
12:21 - Final Thoughts
12:49 - Outro
-
 LIVE
LIVE
Akademiks
2 hours agoDay 1/30. Drake Drops lawsuit vs iHeartMedia? Offset and Cardi Calls it Quits. 50 v Jim Jones?
3,410 watching -
 LIVE
LIVE
Dr Disrespect
8 hours ago🔴LIVE - DR DISRESPECT - WARZONE - 150 PLAYER LOBBIES
3,216 watching -
 1:27:35
Redacted News
3 hours ago"This is NOT normal" Trump just destroyed the woke mob as Dems in disarray | Redacted News Live
95.3K147 -
 1:39:52
Vigilant News Network
4 hours agoUNHINGED: Dems Say That Elon Needs to ‘Go Back to AFRICA?’ | The Daily Dose
58.7K12 -
 1:13:13
Sean Unpaved
4 hours ago $4.39 earnedQB Carousel
45.6K2 -
 1:04:28
Crypto Power Hour
22 hours ago $4.44 earnedThe Crypto Power Hour - ‘In Crypto We Trust’
51.9K4 -
 28:55
28:55
CatfishedOnline
3 hours agoWoman Love Bombed by Salt-and-Pepper Scammer
20.4K2 -
 14:51
14:51
Misha Petrov
3 hours agoDemocrats HUMILIATED at Trump’s Congressional Address! Breaking Down the MUST-SEE Moments
21.7K14 -
 1:39:05
The Quartering
6 hours agoTrump's Epic Speech, Democrat & MSM Meltdown, Zelensky Flip Flops AGAIN & A T*ans CULT Unmasked
103K71 -
 1:28:13
Tucker Carlson
6 hours agoJonathan Roumie: The Weight of Playing Jesus in the Chosen, & Why You Should Observe Lent
140K80