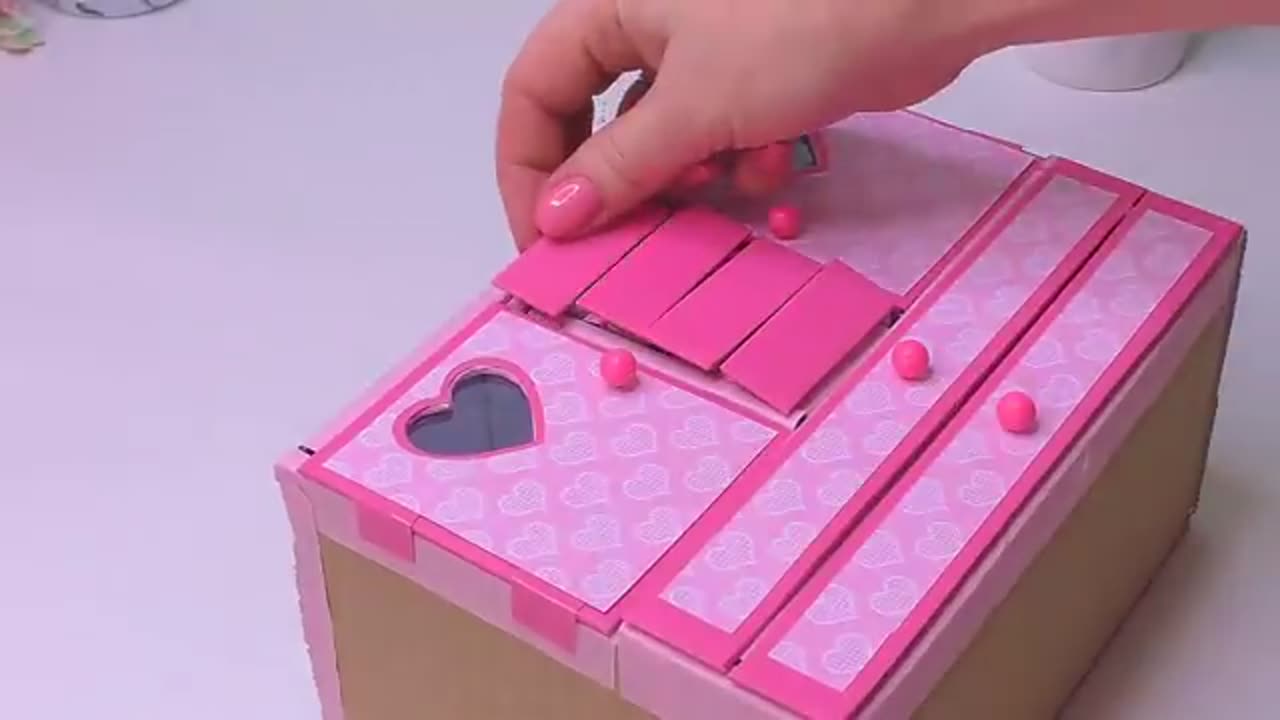
How to make a cute cardboard organizer and matchbox // Best way to use waste material
Creating a cute cardboard organizer and matchbox from waste material is a great DIY project. Here's a step-by-step guide:
Materials Needed:
Cardboard boxes (various sizes)
Empty matchboxes
Scissors
Craft glue or hot glue gun
Decorative paper or fabric scraps
Markers or paint (optional)
Ribbon or twine (optional)
Steps to Make a Cute Cardboard Organizer:
Gather Your Materials: Collect cardboard boxes of different sizes and empty matchboxes. Make sure they are clean and free from any debris.
Cut the Cardboard: Cut the cardboard into pieces of the desired sizes for your organizer compartments. You can make them as large or small as you like, depending on what you plan to store.
Decorate the Cardboard: Cover the cardboard pieces with decorative paper or fabric. This adds a cute and personalized touch to your organizer. Use craft glue to secure the paper or fabric in place.
Assemble the Compartments: Arrange the cardboard pieces to create the compartments of your organizer. You can stack them or arrange them side by side. Use craft glue or a hot glue gun to attach them securely.
Make the Matchbox Drawers:
a. Decorate the empty matchboxes with decorative paper or paint them in cute colors and patterns.
b. Once dry, glue the matchboxes into some of the compartments to create small drawers.
Add Finishing Touches: You can further decorate your organizer with markers, paint, or ribbon. Get creative and add any embellishments you like.
Let It Dry: Allow the glue and any paint to dry completely before using your cute cardboard organizer and matchbox.
Now you have a charming and functional organizer made from waste materials. You can use it to store small items like jewelry, office supplies, or craft materials. It's a great way to upcycle and reduce waste while adding a touch of cuteness to your space!
-
 21:26
21:26
Stephen Gardner
21 hours ago🔥What JUST leaked out of Congress must be STOPPED NOW!
33.7K134 -
 53:25
53:25
tether
11 days agoStability and Freedom in Chaos: The Story of Tether USD₮ | Tether Documentary (USDT)
76.3K5 -
 56:44
56:44
VSiNLive
1 day agoFollow the Money with Mitch Moss & Pauly Howard | Hour 1
32.3K2 -
 36:50
36:50
Anthony Pompliano
2 days ago $9.16 earnedInvestors Are ALL-IN On Bitcoin
19.5K7 -
 32:19
32:19
SB Mowing
9 days agoA Backyard She’s NEVER Seen – Now Safe for the Kids to Play!
24.7K17 -
![[Day 26] CS Blast bounty baby](https://1a-1791.com/video/fwe2/8a/s8/1/Z/H/j/_/ZHj_w.0kob-small-Day-26-CS-Blast-bounty-baby.jpg) 2:09:11
2:09:11
ggezlol_tv
6 hours ago[Day 26] CS Blast bounty baby
42K1 -
 2:32:17
Sgtfinesse
5 hours ago💥Sunday Morning Hunt for Featherweight Artifact | New World PVP Server: Sclavia
57K3 -
 11:25
11:25
Film Threat
21 hours agoLET'S DISCUSS THE 2025 OSCAR NOMINATIONS | Film Threat News
41.7K14 -
 13:07
13:07
DEADBUGsays
5 hours agoThe Southport Massacre, The Great British Cover-Up
36.7K22 -
 25:26
25:26
hickok45
9 hours agoSunday Shoot-a-Round # 265
31.1K28