Premium Only Content
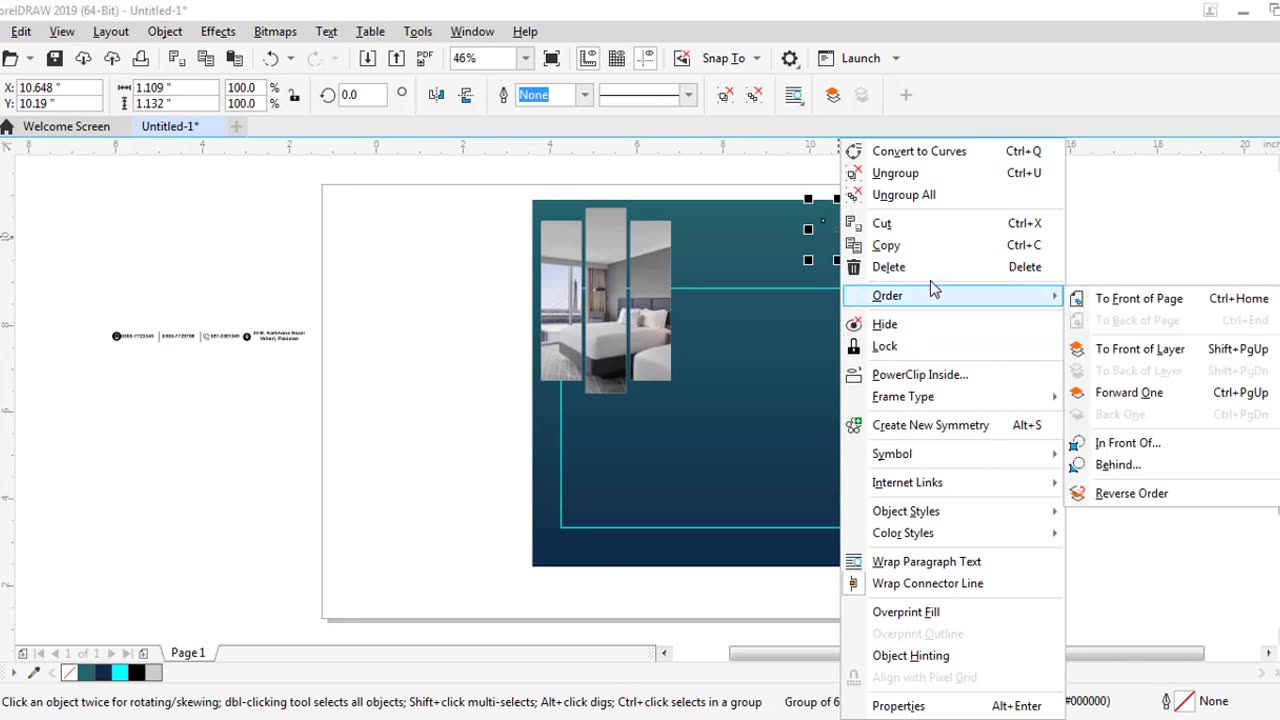
Social Media banner, flyer, broucher MZ Graphic
Sure I can help you with creating a social media banner using CorelDRAW. Here's a step-by-step guide to get you started:
1. Launch CorelDRAW and create a new document by going to File > New.
2. Set the dimensions for your banner. The recommended size for a social media banner varies depending on the platform. Here are a few popular sizes:
- Facebook cover: 820 pixels wide x 312 pixels tall
- Twitter header: 1500 pixels wide x 500 pixels tall
- YouTube channel art: 2560 pixels wide x 1440 pixels tall
3. Once the document is created you can start designing the banner.
4. Choose a background color or image for your banner. You can use the rectangle tool (Shortcut: F6) to draw a shape that covers the entire canvas. Fill the shape with your desired color or import an image using File > Import.
5. Add text to your banner by selecting the text tool (Shortcut: T) and clicking on the canvas. Type in your desired text and adjust the font size and color using the options in the properties bar at the top.
6. To enhance the banner you can add images logos icons or illustrations. You can either create your own graphics or import pre-made ones from external sources. Use the rectangle or ellipse tools to create shapes and arrange them as per your design.
7. Experiment with different effects such as gradients shadows or transparency to make your design visually appealing. These effects can be accessed through the "Effects" menu or the Object properties panel.
8. Once the design is complete save your banner in a suitable format such as JPEG or PNG to maintain its quality. Go to File > Export or File > Save As to save your file.
Remember to consider the guidelines and specifications of the social media platform you intend to use the banner on as they may have specific requirements for file size and content placement.
Have fun designing your social media banner using CorelDRAW!
-
 54:28
54:28
LFA TV
1 day agoUnjust Man | TRUMPET DAILY 2.27.25 7PM
19.7K2 -
 20:10
20:10
CartierFamily
7 hours agoAndrew Schulz DESTROYS Charlamagne’s WOKE Meltdown on DOGE & Elon Musk!
36.8K45 -
 1:36:39
Redacted News
5 hours agoBOMBSHELL EPSTEIN SH*T SHOW JUST DROPPED ON WASHINGTON, WHAT IS THIS? | Redacted w Clayton Morris
145K243 -
 2:03:31
Revenge of the Cis
7 hours agoEpisode 1453: Fat & Fit
48.6K8 -
 2:38:12
The White House
7 hours agoPresident Trump Holds a Press Conference with Prime Minister Keir Starmer of the United Kingdom
160K60 -
 1:01:04
In The Litter Box w/ Jewels & Catturd
1 day agoDrain the Swamp! | In the Litter Box w/ Jewels & Catturd – Ep. 751 – 2/27/2025
91.7K35 -
 1:11:24
Dr. Drew
8 hours agoNEW: Cardiac Arrest In Healthy Young People After mRNA w/ Nicolas Hulscher – Ask Dr. Drew
72.7K34 -
 4:24:53
Right Side Broadcasting Network
12 hours agoLIVE REPLAY: President Trump and UK Prime Minister Starmer Meet and Hold a Press Conference 2/27/25
166K47 -
 2:12:33
Adam Carolla
2 days agoKamala Harris vs. Trump Wildfire Response + Jillian Michaels on Motherhood/Ayahuasca & Sperm Donors!
57.1K21 -
 4:18:28
Barry Cunningham
11 hours agoTRUMP DAILY BRIEFING: PRESIDENT TRUMP AND UK PRIME MINISTER STARMER HOLD PRESS CONFERENCE!
78.7K16