Premium Only Content
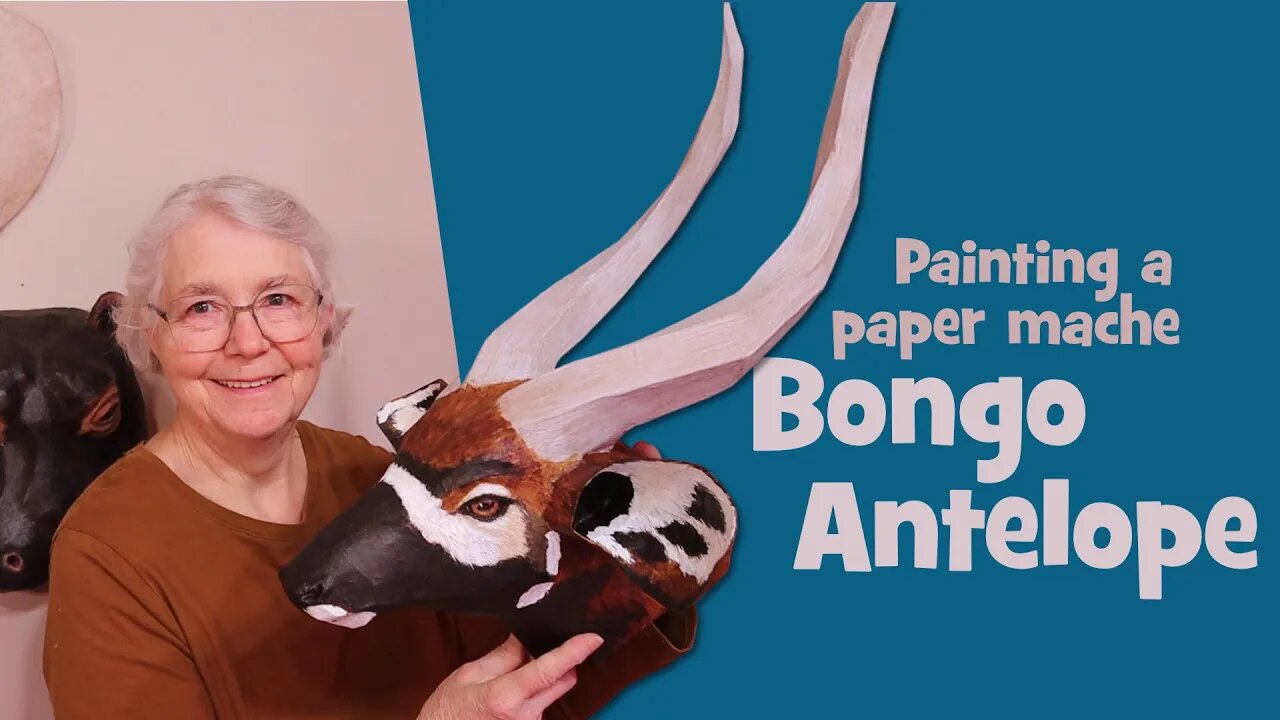
Painting The Paper Mache Bongo Antelope
I experimented again, and I really like the way the horns looked after I painted the bongo antelope. I probably wouldn't paint his face the same way again, though, because the colors would be a lot brighter if it was painted the traditional way, with a base coat of white gesso.
The pattern for the bongo antelope is now online, and you can download it for a small charge and make an antelope of your own. This is not a fast project, because the antelope horns are really long and the pieces take time to tape together. But when it's done, I think it would make a wonderful gift for anyone who loves African animals.
You can find the pattern here: https://www.UltimatePaperMache.com/antelope
Be sure to let me know what you think of this project - your feedback is always appreciated. 😊
You can see the photo I used as my model for the colors here: https://cincinnatizoo.org/animals/bongo/#gallery
That antelope with the crazy horns I mentioned (a Giant Eland): https://en.wikipedia.org/wiki/Tragelaphini
You can find the antelope with horns that look like they have rope wound around them is called an Impala - do a Google search to find them. Most of them have thinner horns than the bongo, but I think it would still be possible to get it to work, with a bit of experimentation.
If you make an antelope of any kind, either using my pattern or made from scratch, please show it off on the Daily Sculptors page on my site. We'd love to see how it comes out.
Chapters:
0:00 Intro - which part of the experiment worked, and what I'd do differently next time
0:45 Other antelopes you could make with the pattern, by changing the horns
2:00 Adding the paper mache
2:54 Brushing on some texture with Acrylic Soft Gel
3:34 Painting the horns - Ultramarine Blue, Burnt Umber and White, plus Golden brand Glazing Liquid and water
4:38 Painting the reddish brown - Burnt Umber and Burnt Sienna with glazing liquid and water
5:33 Painting the black nose and spots - Black with some of the brown added to warm it up
7:00 Painting the light spots and stripes - White mixed with a small amount of yellow ochre with some pure white areas, too
8:23 Paint the eyes - Alizarin Crimson and Cadmium Yellow Light
8:50 Making a few adjustments, filling in bare spots and adding fur texture to the white cheeks
9:19 Adding the fake eyelashes
10:53 Adding fingernail polish to the eyes
11:17 Conclusion
-
 15:38
15:38
Professor Nez
1 hour ago🚨LBJ Phone Call to Jackie Kennedy is the WEIRDEST THING I've EVER Heard! JFK Files Analysis
11.6K50 -
 1:26:12
Michael Franzese
16 hours agoTrump Dismantles DOE, Musk Saves Astronauts, Tesla Under Attack | LIVE
22.3K12 -
 5:18:42
EXPBLESS
6 hours agoNEW CLIX SKIN COMING TO THE ITE M SHOP - MAX XP ON FORTNITE
69.7K10 -
 LIVE
LIVE
Anvilight
4 hours agoFortnite | Saturday Morning Stream! | Creator Program Day #22
317 watching -
 14:16
14:16
Talk Nerdy Sports - The Ultimate Sports Betting Podcast
3 hours ago3/22/25 - March Madness: Who Wins Today? Vas & Riste Pick Every Game!
24.4K1 -
 3:02:33
RG_GerkClan
5 hours ago🔴LIVE - Lets Dominate this Weekend - Escape From Tarkov - Gerk Clan
38.7K2 -
 4:59:23
SoundBoardLord
6 hours ago90's Saturday Morning Cartoons, Chill Vibes & Great Conversations
33.5K1 -
 13:55
13:55
ThinkStory
1 day ago107 Hidden Clues & Details You Missed In Severance Season 2!
34.3K2 -
 24:54
24:54
CatfishedOnline
1 day agoVictim will NOT leave her Romance Scammer
28K5 -
 12:49
12:49
MTNTOUGH Fitness Lab
1 day agoNick Jones: Subzero Saunas and Sucking at Sports | MTNTOUGH Lab Visit
29.6K1