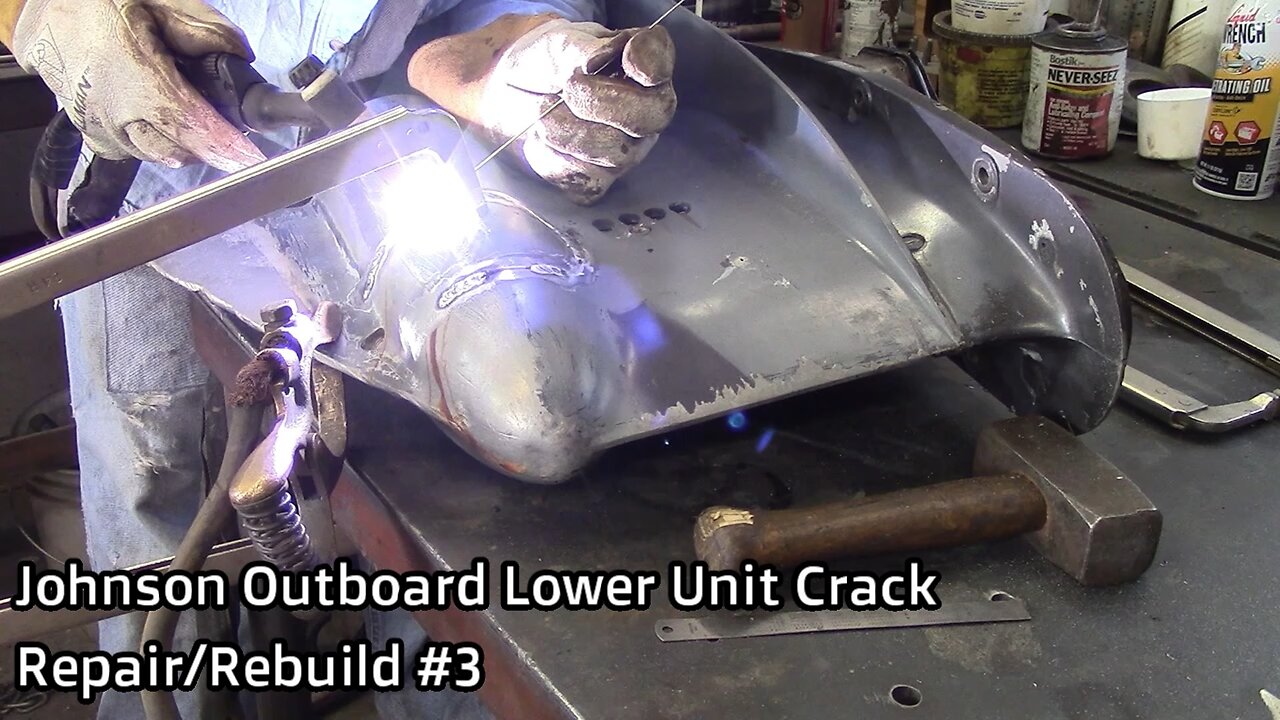
Johnson Outboard Lower Unit Crack Repair/Rebuild #3
Video #3 of the Johnson GT 150 lower unit crack repair/rebuild is on housing clean up, beveling out the crack, and completing the weld repair. This is the second lower unit I have repaired in this same fashion, and both went on for many more years of service and saved the owners in the $1000.00 range. If you attempt this I cannot stress enough do not force anything, take your time. Please check video #1 for more of a description. The music in the sped up sections is called Skinny Leonard by Audionautix is licensed under a Creative Commons Attribution license (https://creativecommons.org/licenses/by/4.0/)
Artist: http://audionautix.com/
Link to some tools, including the pinion nut adapter kit:
http://www.sterndrive.info/outboardmotor/id2.html
Link to exploded view of the lower unit: http://www.sterndrive.info/outboardmotor/1978_1998_v4_90_degree_.html
Buy snap ring pliers: https://www.offshoremarineparts.com/93-13-1045.html?gclid=Cj0KCQiA5aTUBRC2ARIsAPoPJk9wFPQBsX-Hotb4B7Ysnl0JFJ8QXMiLgohL8303qvf6221euzjL2qIaAnfrEALw_wcB
We are going to repair this case!
First to weld aluminum we need to remove all contaminants, oil, grease, water, paint, get it as clean as possible with carburetor cleaner first.
Now we need to grind out a bevel in the case with an angle grinder and a .045” cutting wheel where the crack is so we can get a full penetration weld. I am going to speed this part up.
In this sped up section I will bevel it, remove the paint with a wire wheel, press the broken section back into place and tack weld. You will need to pay attention inside the case, the section that has been machined needs to be virtually perfect when complete that is where the O-ring seals the water section from the gear case grease section.
You want to bevel the crack out and weld beyond the end of the crack to verify there will be no leaks.
I am now welding out the case, notice how I weld a small section at a time alternating areas so I do not put too much stress in any one area of the case, I weld between 1/2” and 1” at a time.
Lower units are cast, made of low grade aluminum and somewhat porous over the years they absorb grease and dirt, and as I beveled it I added extra contaminants, they all have to be boiled out of the weld puddle with aluminum.
I wire brush and sometimes need to grind off the contaminants that boiled to the surface of the weld puddle.
Listen close and you will hear a few oh *hit moments! Then I need to cover a swear word.
Slowly I am becoming aware of what is happening, and am unsure what to do at the moment, here comes a big one.
Now is that time to stop, think, and after you have an idea what’s happening move forward. Some type of internal stress is causing the weld to crack.
The weld is cracking at the nose of the case, I grind out the weld, and my first course of action is to try a preheat.
After a thorough preheat of the case in the welding zone, I go back to welding.
Here it goes again, loud enough it startles me!
Next course of action is to figure out where the stress is coming from and remove it. So I cut across the bottom of the broken section figuring that is where the stress is coming from and bevel that out. Not happy as this means I have to weld across the O-ring sealing section twice. GREAT!
I now try to weld a section at a time and inspect it as I go, and listen for cracking.
I welded out the front side first, then the top, then the back, and well you’ll hear it!
At least it keeps cracking in the same spot. The front section which runs parallel to the O-ring sealing surface and not across it, this is good so I do not booger that up it needs to be welded inside and polished out. Grind the crack out again.
Well that still didn’t work, and it startled me again. What’s the definition of insanity?
There is really only one course of action left.
Turn that #@$%& air compressor off!
Cut the skeg, it is a very thick strong section of the lower unit. It is the only place left that I figured the internal stress could be coming from.
Speed up one more time, after many hours of welding and grinding, I finally removed the stress and got the exterior welded without any cracking. I welded the case complete first, and then the skeg.
Here is the weld completed prior to cleaning up, opposite side of the skeg also. Come back for video #4 when I will weld across the O-ring sealing surfaces inside the case? Please Follow my channels.
https://www.youtube.com/@HRIservicesllcSturgeonBay
https://www.instagram.com/hri_services/
https://www.facebook.com/HRIServicesllc/
https://www.millerwelds.com/
-
 1:04:59
Sarah Westall
4 hours agoRFK Jr Report, Constitution Suspended, War Time Procedures in Place, WHO Exit, DOD w/ Sasha Latypova
24.6K23 -
 1:56:37
Melonie Mac
8 hours agoGo Boom Live Ep 35!
35.8K11 -
 1:01:13
LFA TV
11 hours agoPRESIDENT TRUMP SIGNS LAKEN RILEY ACT | BASED AMERICA 1.29.25 6pm
49.5K6 -
 1:43:07
2 MIKES LIVE
5 hours ago2 MIKES LIVE #172 News Breakdown Wednesday!
25.2K2 -
 1:26:16
The Big Mig™
6 hours agoJ6’r Ryan Samsel Free At Last The BOP & DOJ Exposed
22.6K3 -
 31:34
31:34
The Based Mother
6 hours ago $0.36 earnedEXECUTIVE ORDER MUTILATES GENDER IDEOLOGY! Trump’s pulling out all the stops.
15.7K5 -
 1:05:44
The Amber May Show
23 hours ago $0.26 earnedSaving The Innocence | Rescuing Children From Rape Trafficking | Alan Smyth
20.5K3 -
 1:40:46
In The Litter Box w/ Jewels & Catturd
1 day agoIs the Jab Poisonous? | In the Litter Box w/ Jewels & Catturd – Ep. 730 – 1/29/2025
87.2K54 -
 2:06:16
Darkhorse Podcast
10 hours agoConfirmation of Cool: The 262nd Evolutionary Lens with Bret Weinstein and Heather Heying
98.4K58 -
 15:20
15:20
Silver Dragons
7 hours agoCENTRAL BANKS to Start Buying SILVER? Dealer Reveals What Silver Price Will Do
36.4K5