Premium Only Content
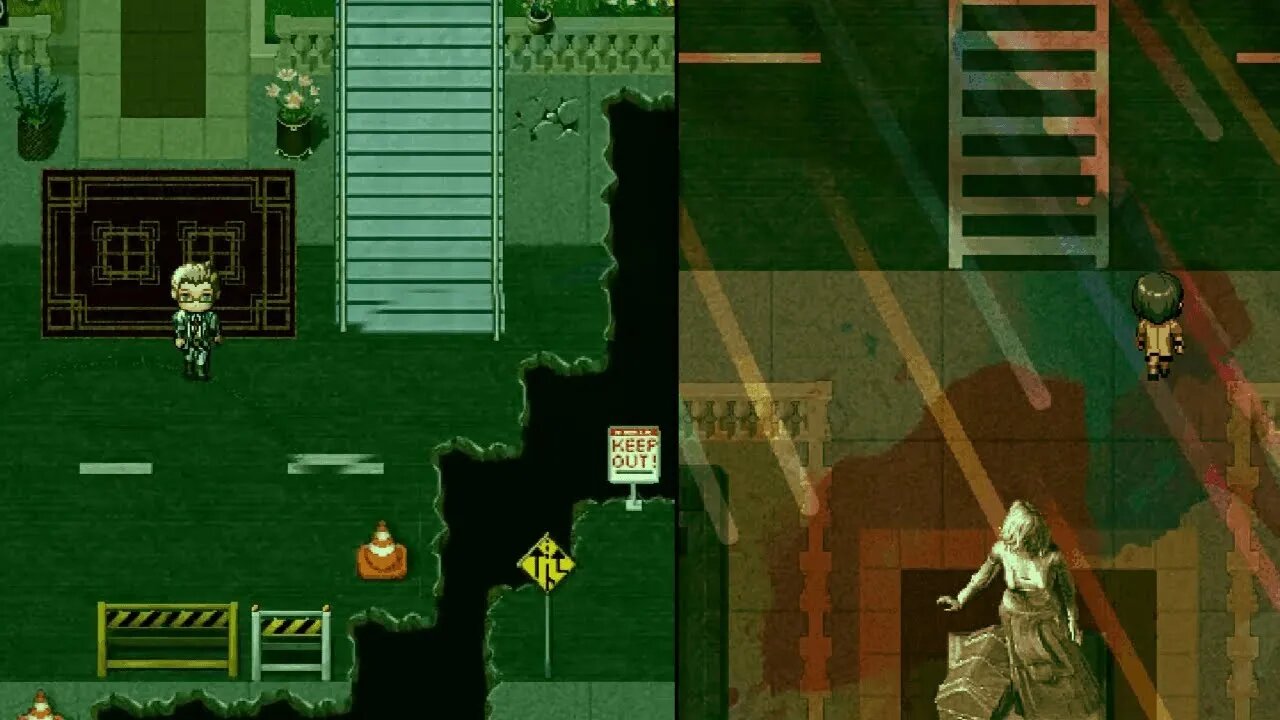
Plugging MV #22 Using Multiple Cameras and Reversing BGMs | Split Screens
Discord Invite: https://discord.gg/hVVdm5Z
'Plugging MV' is a series where I showcase interesting (community-made) plugins for RPG Maker MV, as I discover them myself, while going through a list of 4000+ plugins.
#RPGMaker #Plugin #Cutscene
PLUGIN:
MultipleCameras.js
ReverseBGM.js
MultipleCameras.js allows us to create multiple cameras on-screen, each focusing on a different location/event on the map.
ReverseBGM.js is for playing BGMs in reverse.
PROGRAMMER: くらむぼん (Kuramubon) & Tsukimi
Tested on Version: 1.5.1
DOWNLOAD LINKS:
MultipleCameras.js
https://github.com/krmbn0576/rpgmakermv/blob/master/js/plugins/MultipleCameras.js
(Right Click on 'Raw', and select 'Save link as...')
ReverseBGM.js
https://tm.lucky-duet.com/viewtopic.php?t=5258
(At the bottom of the very first post, you will find a file named ReverseBGM.js clicking it will download the plugin.)
HOW TO:
++MultipleCameras.js:
NOTE: - This plugins doesn't work well with pictures, or plugins that use picture to help add graphics. (This includes parallax mapping related plugins, and Yanfly's doodads.)
Would be awesome if someone could fix or patch this issue. Otherwise, this is an EPIC plugin!
Let's get into the how-to then!
To set a camera (or use splitscreen) with preset setting, use the following plugin command:
camera set horizontal
You can replace 'horizontal' with 'vertical', or 'quarter', for different camera presets.
Here's some explanation on the presets:
'horizontal' will split the screen into two, horizontally from the middle. The top camera has ID '0', and the bottom camera has ID '1'. (These IDs will be used to manipulate the camera.)
'vertical' will split the screen into two, vertically, from the middle. The left camera has ID '0' and the bottom camera has ID '1'
'quarter will split the screen into 4 from the middle. Upper left is '0', upper right is '1', lower left is '2', lower right is '3'.
That's it for the presets. Now, let's look into how you can create your OWN camera!
camera set CameraID X Y Width Height
here,
'CameraID' = 0, 1, 2, 3.... (and so on)
(Use any number. This will be the camera's ID.)
'X' = 0, 1, 2, 3... (and so on. Values can also be in decimal, like 1.3, or 6.7.)
(Horizontal distance of the Camera from upper left. This is measured in tiles. Replacing 'X' with '1' means pushing the camera '1 tile' or '48 pixels' to the right.)
'Y' = 0, 1, 2, 3... (and so on. Values can also be in decimal.)
(Vertical distance of the Camera from the top. This is measured in tiles. Replacing 'Y' with '1' means pushing the camera '1 tile' or '48 pixels' down.)
'Width' = 0, 1, 2, 3... (and so on. Values can also be in decimal.)
(Width of the Camera. Measured in tiles.)
'Height' = 0, 1, 2, 3... (and so on. Values can also be in decimal.)
(Height of the Camera. Measured in tiles.)
Example:
camera set 0 1 1 3 3
(Creates a camera at the top left, that is 3 tiles wide and 3 tiles high.)
To focus a camera on a particular event, use the following plugin command:
camera target CameraID event EventID
here,
CameraID = the ID number of a camera you've created.
EventID = ID of the event you want the camera to focus on ('0' is for 'this event'. And '-1' is for player.)
Example:
camera target 0 event 2
(This will set the focus of the camera '0', on event '2'.)
To focus a camera on a particular position on the map, use the following plugin command:
camera target CameraID xy X-pos Y-Pos
here,
CameraID = the ID number of a camera you've created.
X-pos = X position of the tile on the map.
Y-Pos = Y position of the tile on the map.
Example:
camera target 0 xy 27 19
(This will focus the camera '0' on map position 27x and 19y.)
To remove a camera, use:
camera remove CameraID
Example:
camera remove 0
(This will remove camera 0)
(You can also use '-1' as CameraID, to remove the main screen.)
To remove all cameras and settings, use:
camera reset
To format the borders around the cameras you create, use:
Camera frame Thickness Color
here,
Thickness = 0, 1, 2, 3... (And so on)
(Decides the thickness of the border.)
Color = hex code of any color (without the hash symbol)
Example:
camera frame 3 ff0000
(This will increase the thickness of the border to 3, and change its color to red.)
To disable touch input inside the camera you've created, use:
camera notouch CameraID
Example:
camera notouch 0
(This will disable touch input inside camera number 0.)
++ReverseBGM.js
Use the following plugin command right before playing a BGM, to reverse it:
reverseBGM ON
Use the following plugin command to turn the reversing off for the next BGM:
reverseBGM OFF
(Be sure to read the official instructions inside the plugins, to better understand how to use them.)
BGM Used in Video: by Herbal Tea - Artificial Music
https://www.youtube.com/watch?v=9mqg7fpeUo4
-
 1:01:13
Candace Show Podcast
3 hours agoBlake Lively's BOMBSHELL Legal Filing | Candace Ep 149
64.3K61 -
 1:11:22
Vigilant News Network
6 hours agoElon Musk Shuts Down RFK Jr. Critics With One Powerful Statement | The Daily Dose
37.6K8 -
 LIVE
LIVE
Dad Dojo Podcast
18 hours agoEP20: The Super Bowl and Solving The Economy
95 watching -
 4:49
4:49
Tactical Advisor
3 days agoBest Small Handgun Optics | CH PWS Shot Show 2025
5.94K1 -
 1:01:21
In The Litter Box w/ Jewels & Catturd
22 hours agoI've Got Your Proof - Right Here! | In the Litter Box w/ Jewels & Catturd – Ep. 745 – 2/19/2025
84.5K24 -
 2:14:30
FreshandFit
6 hours agoDavid Icke On COVID Lies, Censorship, Secret Societies, Infiltration of MAGA, AI Control, Alternative Media Subversion And MORE!
85.1K41 -
 1:41:41
The Quartering
8 hours agoTrump's New IVF Order, GameStop CEO Denounces Wokeness Amid Sale, and Elon Musk's DOGE Role Revealed
112K58 -
 LIVE
LIVE
Dr Disrespect
7 hours ago🔴LIVE - DR DISRESPECT - TARKOV - ZERO TO HERO PISTOL ONLY
2,173 watching -
 1:55:42
Film Threat
9 hours agoCRISIS ON MULTIPLE MARVEL MOVIES! | Hollywood on the Rocks
17.7K1 -
 49:19
49:19
Miss Understood With Rachel Uchitel
1 day agoKris Krohn: The Real Estate Playbook for Financial Freedom
67.4K3