Premium Only Content

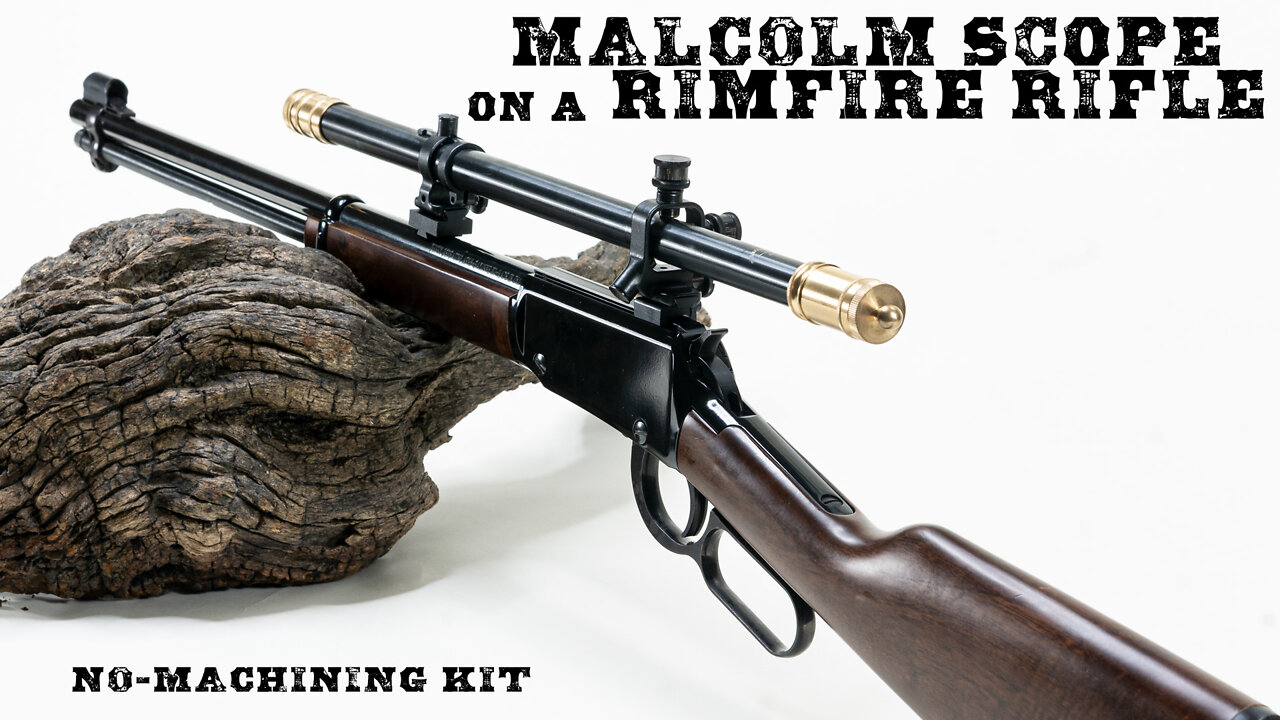
Mounting a Malcolm Scope on your Rimfire Lever Action - The No-Machining Mount
Howdy all! We're back the range to show you our latest no-machining contraption: The Malcolm Rimfire Mounts. The kit takes advantage of a few features common across many rimfire models. This mounting kit is a two-piece set:
1. The front mount is built to slide into the rear 3/8" dovetail on your rifle. You'll have to knock out your rear iron sight, and then installation is a breeze. Just slide the appropriate part of the mount into the dovetail, roughly center it, then tighten the set screw in the center.
2. The rear mount slides onto the 11mm rail found atop the receiver. The rail doesn't need to be exactly 11 millimeters - it's a clamp style that fits a wide range of sizing tolerances. When you've got the clamp where you want it, tighten the two crossbolts to lock the rear mounting block in place.
After that, slide your scope on top and set your eye relief. You're all done.
These mounts are ambidextrous and accept both standard crossbolt styles. Whether you have a Posa Cut or Crescent Cut, and whether you want that cut on the left or right side, just turn the mount in the appropriate direction during installation. I tend to slide the rear mount back until the mounts are spaced 7.25" center-to-center. This keeps my adjustments consistent between rifles.
Rimfire rifles such as these have remarkably little recoil. I tested these mounts without Loctite, and they held up perfectly fine. If you do want to add some Loctite, it'll just stay there all the more firmly. I'd stick with the blue color (the red is rather difficult to remove).
In this video, you'll see the mounts go on to a Henry H001 rifle, and then a Malcolm 6X Two-Tone scope installed on top of them.
-
 12:24
12:24
Winston Marshall
1 day agoWOAH! Bannon just Revealed THIS About MUSK - The Tech-Right vs MAGA Right Civil War Ramps Up
196K296 -
 7:33:46
Phyxicx
17 hours agoRaid & Rant with the FF14 Guild on Rumble! Halo Night just wrapped up! - Go Follow all these great guys please! - 2/15/2025
134K4 -
 10:42:19
Reolock
19 hours agoWoW Classic Hardcore (LVL 60) | RAID DAY | Rumble FIRST HC Raid
84.5K5 -
 3:10:03
Barry Cunningham
16 hours agoTRUMP WEEKEND BRIEFING! MORE WINNING...MORE LEFTIES LOSING IT!
63.3K40 -
 2:20:09
Tundra Tactical
16 hours ago $3.09 earnedIs Trumps Executive Order A Second Amendment Wishlist???: The Worlds Okayest Gun Live Stream
43.3K2 -
 2:33:51
John Crump Live
21 hours ago $27.37 earnedSaturday Night Main Event!
140K14 -
 13:57
13:57
TimcastIRL
1 day agoTrump NUKES IRS After DOGE Investigation, OVER 9000 Employees To Be FIRED
145K189 -
 13:35
13:35
Russell Brand
19 hours agoPFIZER JUST MADE THEIR NEXT MOVE AND EXPERTS ARE TERRIFIED
168K340 -
 1:15:57
Victor Davis Hanson Show
1 day agoOver Here, Over There: the Russo-Japanese War and Trumpian Peace Policy
81.7K37 -
 23:55
23:55
MYLUNCHBREAK CHANNEL PAGE
1 day agoThe Nephilim Are Here
104K103