Premium Only Content
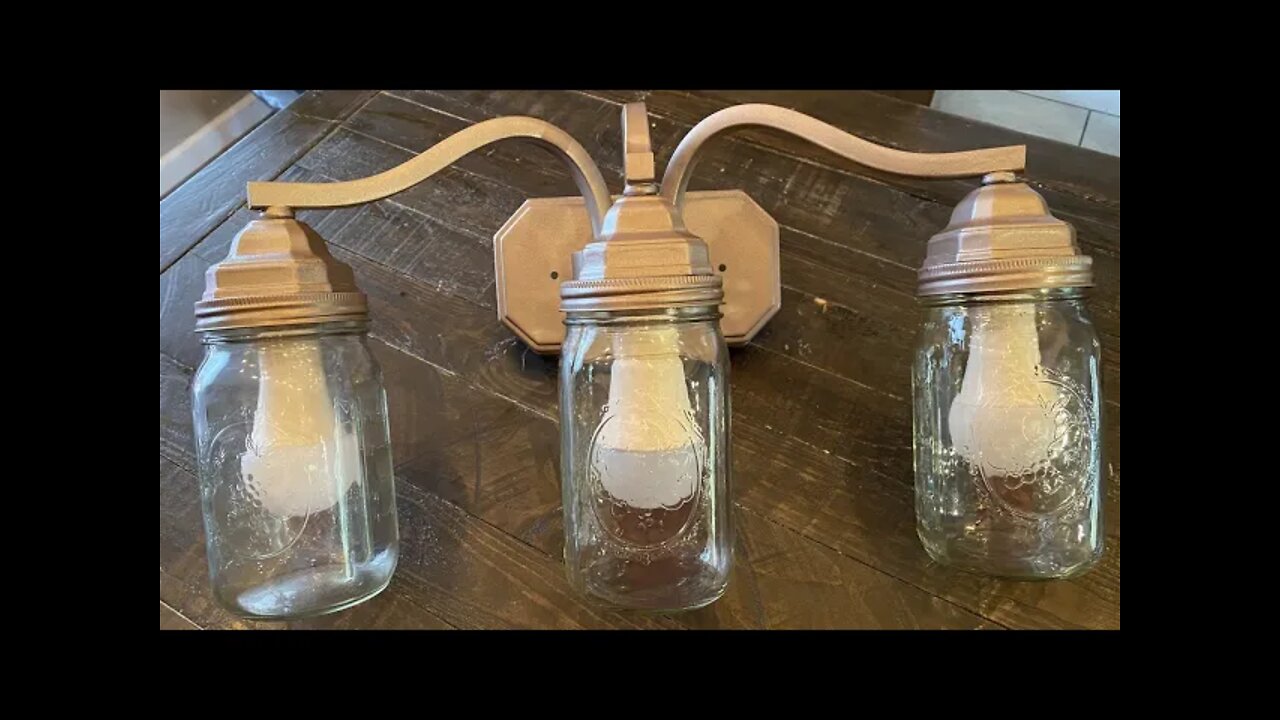
DIY Rustic Mason Jar Lights
Marie's sons' broken bamboo blinds started a cascade of bathroom projects that resulted in a full bathroom makeover. Her light fixture was the last project on the list. It was a nice fixture but was too dark and not rustic enough for her new decor. She decided on a DIY Rustic Mason Jar Light Fixture. In this video, Marie and Emmaline of Wisdom Preserved show you how to recreate it in your own bathroom.
My sons’ broken bamboo blinds started a cascade of bathroom projects that resulted in a full bathroom makeover. This light fixture was the last project on the list. It was a nice fixture but was too dark and not rustic enough for my new decor. I decided on a DIY Rustic Mason Jar Light Fixture.
I started by removing the light bulbs and then the shades. One of them stuck a little so I had to use needle-nose pliers to help me. These are held on by a plastic piece (light socket shade ring) that screws on and off. I set all of these off the side except one of the rings.
I then prepared for the next step by getting a permanent marker, a hammer, a nail, 3 wide mouth mason jars, lids, and rings. I used the shade ring center hole as my template and drew a circle in the center on the top of my lids.
Next, I placed the lid on my jar with the ring and used the hammer and nail to create a ring of closely-spaced holes on the outside edge of the circle I drew.
Next, I used a pair of wire cutters to finish cutting through the circle of holes.
I recommend work gloves at this point since the metal is very sharp. Now wearing my gloves, I push the cut circle all the way out.
This does leave some rough edges so I like to use the hammer to lightly tap them flat. I repeated this step on the other two lids.
Now is the time to put the lids and rings on the light fixture. I put all the lids inside the rings and placed them over the sockets using the shade ring to hold them in place.
Now that I had all the basics, I needed to make the colors match. I had wanted a lighter color anyway, so this was a good step for me. (A lot of times you can find nice fixtures in an unpopular color for good prices.) I used Krylon Supermax in hammered brown spray paint. Usually, I spray paint outside. If you spray inside, you should be sure to have good ventilation and cover any close surfaces to protect from overspray. Clean all surfaces of the fixture. Shake the paint can well before you start. Spray from multiple different angles to be sure you obtain full overage. Do not spray any one spot too long or it will begin to pool and run.
After the paint has dried, screw in your light bulbs. Next, place the jars over the light bulbs and screw them onto the rings making the jars all face the direction you want.
I began the project with regular modern mason jars but then switched them out for antique jars a friend gave me.
I later replaced my normal light bulbs with Edison LED bulbs and I like them much better.
This has been a great project for culminating my bathroom remodel. It really makes a big difference in the feel of the room, but cost very little out of pocket.
Website: https://wisdompreserved.life/diy-rustic-mason-jar-light-fixture/
Shop for some of our favorite products with us: https://amzn.to/2P0cyKU
Music: Porch Swing Days - faster Kevin MacLeod (incompetech.com)
Licensed under Creative Commons: By Attribution 3.0 License
http://creativecommons.org/licenses/by/3.0/
Intro: (00:00)
What we are making: (00:11)
Finished Lights: (00:40)
Process: (01:18)
Outro: (03:28)
-
 12:08
12:08
Wisdom Preserved
1 year agoMidsummer Oasis: Mittleider Garden Tour and Report | July 20, 2023
133 -
 1:30
1:30
sbrinlee
2 years agoGrow Lights
4 -
 0:30
0:30
bart326
2 years ago $0.02 earnedlandscape lights
35 -
 5:55
5:55
Tools In Action
2 years agoSouthwire Topaz Lights Lights
32 -
 6:11
6:11
Leitrim
2 years agoDIY Rustic Clock
19 -
 9:16
9:16
This Southern Girl Can
2 years agoEaster Crafts: Rustic Easter Decor | Rustic Easter DIY | Rustic Easter Bunny
101 -
 1:10:18
FamilyFriendlyGaming
22 hours ago $17.84 earnedCat Quest III Episode 2
112K -
 20:07
20:07
DeVory Darkins
1 day ago $19.69 earned"They Talking About Finance!" The View FRUSTRATED by NYC Mayor TRUTH BOMB
81.1K88 -
 1:20:18
Steve-O's Wild Ride! Podcast
2 days ago $11.17 earnedThe Hawk Tuah Girl Is Really Becoming Successful! - Wild Ride #243
61.3K5 -
 1:29:26
Game On!
23 hours ago $9.68 earnedJon Jones vs Stipe Miocic Heavyweight Title Fight | UFC 309 Preview
58.1K5