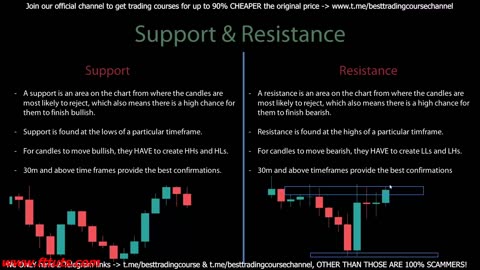
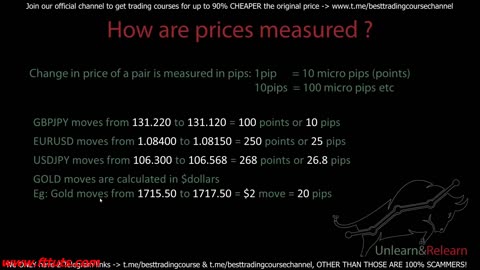
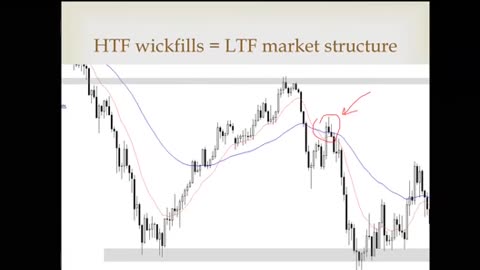
1. 4 Bias and Execution on Fast Moving Price - (6.Back to The Basics)

    4 Bias and Execution on Fast Moving Price - (6.Back to The Basics)

    5
    0
    656
  2. 3 When to Take Buys and Sells - (6.Back to The Basics)

    3 When to Take Buys and Sells - (6.Back to The Basics)

    2
    0
    715
  3. 2 Defining Support _ Resistance - (6.Back to The Basics)

    2 Defining Support _ Resistance - (6.Back to The Basics)

    3
    0
    566
  4. 3 Things to Do When You Take a Loss + Examples - (5.Learning From Losses)

    3 Things to Do When You Take a Loss + Examples - (5.Learning From Losses)

    3
    0
    651
    1
  5. 2 What Happens When You Take a Loss (Emotions) - (5.Learning From Losses)

    2 What Happens When You Take a Loss (Emotions) - (5.Learning From Losses)

    3
    0
    544
  6. 6 Simulation 25_ Week - (4.Adding Positions to Trades - Trends)

    6 Simulation 25_ Week - (4.Adding Positions to Trades - Trends)

    7
    0
    736
    1
  7. 4 Defining Consolidation _ How to Approach It - (4.Adding Positions to Trades - Trends)

    4 Defining Consolidation _ How to Approach It - (4.Adding Positions to Trades - Trends)

    3
    0
    581
  8. 2 Defining an Uptrend - (4.Adding Positions to Trades - Trends)

    2 Defining an Uptrend - (4.Adding Positions to Trades - Trends)

    2
    0
    551
  9. 1 When Do Trends Happen - (4.Adding Positions to Trades - Trends)

    1 When Do Trends Happen - (4.Adding Positions to Trades - Trends)

    2
    0
    561
  10. 2 Fakeouts and How to Trade Them - (3.Advanced Technical Concepts)

    2 Fakeouts and How to Trade Them - (3.Advanced Technical Concepts)

    6
    0
    797
    3
  11. 1 Giving Trades a Second Chance - (3.Advanced Technical Concepts)

    1 Giving Trades a Second Chance - (3.Advanced Technical Concepts)

    5
    0
    824
    2
  12. 3 How to Effectively Backtest - (2.Psychology _ Trade Management)

    3 How to Effectively Backtest - (2.Psychology _ Trade Management)

    4
    0
    639
  13. 17 Trading Plan - MARKETFLUIDITY ( 1. Unlearn _ Relearn)

    17 Trading Plan - MARKETFLUIDITY ( 1. Unlearn _ Relearn)

    3
    0
    694
  14. 16 Rejection in Zones - MARKETFLUIDITY ( 1. Unlearn _ Relearn)

    16 Rejection in Zones - MARKETFLUIDITY ( 1. Unlearn _ Relearn)

    5
    0
    850
  15. 8 Risk Management 2.0 - MARKETFLUIDITY ( Unlearn _ Relearn)

    8 Risk Management 2.0 - MARKETFLUIDITY ( Unlearn _ Relearn)

    4
    0
    668
  16. 7 Support _ Resistance 1.0 - MARKETFLUIDITY ( Unlearn _ Relearn)

    7 Support _ Resistance 1.0 - MARKETFLUIDITY ( Unlearn _ Relearn)

    5
    0
    852
  17. 3 Lots and Leverage - MARKETFLUIDITY ( Unlearn _ Relearn)

    3 Lots and Leverage - MARKETFLUIDITY ( Unlearn _ Relearn)

    6
    0
    1.02K
  18. 8 Analysis paralysis + Trading plan - (7.The Signs 2.0)

    8 Analysis paralysis + Trading plan - (7.The Signs 2.0)

    2
    0
    671
  19. 7 Higher timeframes vs Lower timeframes - (7.The Signs 2.0)

    7 Higher timeframes vs Lower timeframes - (7.The Signs 2.0)

    3
    0
    660
  20. 3 Protecting Yourself From Yourself - (7.The Signs 2.0)

    3 Protecting Yourself From Yourself - (7.The Signs 2.0)

    4
    0
    612
  21. 6 Simulation - Back to The Basics - (6.Back to The Basics)

    6 Simulation - Back to The Basics - (6.Back to The Basics)

    3
    0
    693