

How to make crispy & juicy Japanese Katsu Curry (pork cutlet curry) from scratch
Make delicious cutlet curry using commercially available Java Curry roux.
Delicious Umami curry made with carmelized onions spooned over crispy and juicy Tonkatsu (fried pork cutlet). Easy but authentic. Try this recipe with a few secret tips, such as pork that is softened with grated onions, nutmeg and curry powder that you add a little when adding roux.
Watch this video to learn how to make homemade bread crumbs.
👉 https://youtu.be/RDgoqP9I9E0
=============================================================
❥ YouTube :
https://www.youtube.com/channel/UCDvC...
❥ Instagram : https://www.instagram.com/hungrycooki...
=============================================================
● Ingredients (for 1 to 4 people)
+++Rice+++
・ Rice ... 3/4 cup x number of people
・ Water ... 3/4 cup x number of people
+++Curry+++
・ Chicken thigh ... 2 pieces
・ Onions ... 1
・ Carrot ... 1
・ Mushroom ... 3
・ Asparagus ... 3
・ Celery ... 1
・ Peppers ... 1/2
・ Garlic ... 4 ~ 5
・ Commercially available curry roux ... 1 box
・ Water ... 4.5 ~ 5 cups
・ Nutmeg ... 1 to 1.5 teaspoons
・ Curry powder ... 2 teaspoons
・ Salt
・ Hon-Dashi ... 1 teaspoon
・ Olive oil
+++Tonkatsu+++
・ Pork loin ... for the number of people
・ Grated onions ... Appropriate amount
・ Bread crumbs ... Appropriate amount
・ Egg ... 1
・ Flour ... Appropriate amount
・ Salt
・ Black pepper
・ Salad oil
● Cooking Instructions
① Tenderize the pork lightly with a kitchen mallet, cut the muscles in meat, (make slits in the tough fibers) then marinade with the chopped onions and leave for about 30 minutes.
② Slice the onions and mushrooms, and finely chop the garlic.
Cut carrots, celery, asparagus, and peppers into bite-sized pieces (they will melt after simmered for a long time, so any shape is acceptable)
③ Cut chicken into bite-sized pieces and sprinkle with salt and pepper.
④ Put olive oil in a frying pan, put garlic in it, turn it on, and use medium-low heat to bring out the scent of garlic.
⑤ When the garlic scent comes out, add the onions, sprinkle a pinch of salt and fry until the onions turn light amber.
when the onion is fried, add other vegetables to high heat and fry until the whole is tender.
When the vegetables are fried, transfer them to a deep pot for boiling.
⑥ fry chicken in a frying pan which vegetables were fried, and when the surface of the meat is browned, transfer it to a deep pan adding to the vegetables.
⑦ Put 4.5 to 5 cups of water in the pot of vegetables and chicken and bring to a boil over high heat.
(The amount of water is a little less than the amount written on the box of roux to make curry thicker and richer)
⑧ When it boils, remove the forms floating on the surface, reduce the heat to as low as possible, add Hon-Dashi, nutmeg, curry powder, and curry roux, and melt the roux while stirring well.
⑨ When the roux is completely melted, cover it and simmer for about an hour on low heat as much as possible.
Check once every 10 to 15 minutes and stir well so that the curry does not burn on the bottom.
⑩ Wash the rice for about 3 times and add water, then cook it in a rice cooker
⑪ Rinse the pork from ② with water, sprinkle with salt and pepper, and prepare flour, beaten eggs, and panko (bread crumbs) on a flat pad.
⑫ Prepare the oil to fry the pork cutlet and start heating it.
⑬ First apply a thin layer of flour to the pork, then dip it in beaten egg, coat the pork with panko
⑭ When the oil gets hot, fry it at a temperature of 170 to 180 degrees until it becomes crispy and golden, for 2 to 3 minutes on one side, turn it over in the middle and fry both sides.
⑮ When the Tonkatsu is fried, put it on kitchen paper, drain off the oil well and cut it into a size that is easy to eat.
⑯ Put the cutlet on the rice and pour the curry from above to complete.
● Cooking tips
・ I use chicken for my personal preference, but any meats works for making delicious curry.
・ My favorite curry roux is Java Curry shown in the video.
・ Please adjust the amount of water to cook rice according to the condition of the rice cooker or rice (new rice or old rice).
・ Since the amount of water to boil the curry comes from the vegetables, it is better to put it in a little less than the specified amount written on the roux box.
・ By marinating pork with onions, the onion enzymes soften the meat.
・ If possible, leave the curry overnight, simmer it for a while the next day. it will add depth of the taste to curry.
256
views
1
comment

How to make crispy & juicy katsu curry using java
Make delicious cutlet curry using commercially available Java Curry roux.
Delicious Umami curry made with carmelized onions spooned over crispy and juicy Tonkatsu (fried pork cutlet). Easy but authentic. Try this recipe with a few secret tips, such as pork that is softened with grated onions, nutmeg and curry powder that you add a little when adding roux.
Watch this video to learn how to make homemade bread crumbs.
👉 https://youtu.be/RDgoqP9I9E0
=============================================================
❥ YouTube :
https://www.youtube.com/channel/UCDvC...
❥ Instagram : https://www.instagram.com/hungrycooki...
=============================================================
● Ingredients (for 1 to 4 people)
+++Rice+++
・ Rice ... 3/4 cup x number of people
・ Water ... 3/4 cup x number of people
+++Curry+++
・ Chicken thigh ... 2 pieces
・ Onions ... 1
・ Carrot ... 1
・ Mushroom ... 3
・ Asparagus ... 3
・ Celery ... 1
・ Peppers ... 1/2
・ Garlic ... 4 ~ 5
・ Commercially available curry roux ... 1 box
・ Water ... 4.5 ~ 5 cups
・ Nutmeg ... 1 to 1.5 teaspoons
・ Curry powder ... 2 teaspoons
・ Salt
・ Hon-Dashi ... 1 teaspoon
・ Olive oil
+++Tonkatsu+++
・ Pork loin ... for the number of people
・ Grated onions ... Appropriate amount
・ Bread crumbs ... Appropriate amount
・ Egg ... 1
・ Flour ... Appropriate amount
・ Salt
・ Black pepper
・ Salad oil
● Cooking Instructions
① Tenderize the pork lightly with a kitchen mallet, cut the muscles in meat, (make slits in the tough fibers) then marinade with the chopped onions and leave for about 30 minutes.
② Slice the onions and mushrooms, and finely chop the garlic.
Cut carrots, celery, asparagus, and peppers into bite-sized pieces (they will melt after simmered for a long time, so any shape is acceptable)
③ Cut chicken into bite-sized pieces and sprinkle with salt and pepper.
④ Put olive oil in a frying pan, put garlic in it, turn it on, and use medium-low heat to bring out the scent of garlic.
⑤ When the garlic scent comes out, add the onions, sprinkle a pinch of salt and fry until the onions turn light amber.
when the onion is fried, add other vegetables to high heat and fry until the whole is tender.
When the vegetables are fried, transfer them to a deep pot for boiling.
⑥ fry chicken in a frying pan which vegetables were fried, and when the surface of the meat is browned, transfer it to a deep pan adding to the vegetables.
⑦ Put 4.5 to 5 cups of water in the pot of vegetables and chicken and bring to a boil over high heat.
(The amount of water is a little less than the amount written on the box of roux to make curry thicker and richer)
⑧ When it boils, remove the forms floating on the surface, reduce the heat to as low as possible, add Hon-Dashi, nutmeg, curry powder, and curry roux, and melt the roux while stirring well.
⑨ When the roux is completely melted, cover it and simmer for about an hour on low heat as much as possible.
Check once every 10 to 15 minutes and stir well so that the curry does not burn on the bottom.
⑩ Wash the rice for about 3 times and add water, then cook it in a rice cooker
⑪ Rinse the pork from ② with water, sprinkle with salt and pepper, and prepare flour, beaten eggs, and panko (bread crumbs) on a flat pad.
⑫ Prepare the oil to fry the pork cutlet and start heating it.
⑬ First apply a thin layer of flour to the pork, then dip it in beaten egg, coat the pork with panko
⑭ When the oil gets hot, fry it at a temperature of 170 to 180 degrees until it becomes crispy and golden, for 2 to 3 minutes on one side, turn it over in the middle and fry both sides.
⑮ When the Tonkatsu is fried, put it on kitchen paper, drain off the oil well and cut it into a size that is easy to eat.
⑯ Put the cutlet on the rice and pour the curry from above to complete.
● Cooking tips
・ I use chicken for my personal preference, but any meats works for making delicious curry.
・ My favorite curry roux is Java Curry shown in the video.
・ Please adjust the amount of water to cook rice according to the condition of the rice cooker or rice (new rice or old rice).
・ Since the amount of water to boil the curry comes from the vegetables, it is better to put it in a little less than the specified amount written on the roux box.
・ By marinating pork with onions, the onion enzymes soften the meat.
・ If possible, leave the curry overnight, simmer it for a while the next day. it will add depth of the taste to curry.
217
views
1
comment
![[ASMR NO MUSIC] How To Make Japanese Panko (パン粉 / Bread Crumbs) From Leftover Bread At Home](https://1a-1791.com/s/s8/1/t/g/E/t/tgEte.oq1b.2-small-ASMR-NO-MUSIC-How-To-Make-J.jpg)
[ASMR NO MUSIC] How To Make Japanese Panko (パン粉 / Bread Crumbs) From Leftover Bread At Home
Panko (パン粉) is a type of flaky bread crumbs used in Japanese cuisine as a crunchy coating for fried foods, such as Tonkatsu. For the most authentic taste, use soft, crustless white bread. It's very easy to make if you ever find yourself in a bind when making Japanese cuisine that calls for Panko and you have none! Simply by dehydrating bread in an oven on its lowest setting or by leaving in the fridge wrapped in a paper towel and processing it, you can make yourself some super crunchy Panko.
Store in an airtight container in freezer to save for a later date.
=============================================================
❥ Please subscribe our channel! :
https://www.youtube.com/channel/UCDvCGAygv511zlEkVAWQfbA
❥ Instagram :
https://www.instagram.com/hungrycookingstudio/
=============================================================
● Ingredients
・Stale (White) Bread
● Recipe
① Wrap leftover bread in a paper towel and let dry in the refrigerator for 2~3 days. If in a rush, dehydrate in oven set to its lowest setting for an hour or as needed.
② When the bread is stiff, cut and tear into small pieces and process in a food processor.
③ Sift the bread crumbs through a coarse sieve. Repeat steps ② and ③ as many times as needed to achieve desired amount.
● Cooking tips
・it’s convenient to store the finished Panko in the freezer
・for best results, use white, crustless bread (Shokupan, if you can find it locally)
・large bread crumbs remaining after sieving can be warmed in the microwave for a short time to dry, and then poured into a food processor again to break them into small pieces. when yusing the microwave, it's a good idea to check on it often as not to burn the bread.
46
views

How to make homemade Japanese panko
Panko (パン粉) is a type of flaky bread crumbs used in Japanese cuisine as a crunchy coating for fried foods, such as Tonkatsu. For the most authentic taste, use soft, crustless white bread. It's very easy to make if you ever find yourself in a bind when making Japanese cuisine that calls for Panko and you have none! Simply by dehydrating bread in an oven on its lowest setting or by leaving in the fridge wrapped in a paper towel and processing it, you can make yourself some super crunchy Panko.
Store in an airtight container in freezer to save for a later date.
=============================================================
❥ Please visit & subscribe our YouTube channel! :
https://www.youtube.com/channel/UCDvC...
❥ Instagram :
https://www.instagram.com/hungrycooki...
=============================================================
● Ingredients
・Stale (White) Bread
● Recipe
① Wrap leftover bread in a paper towel and let dry in the refrigerator for 2~3 days. If in a rush, dehydrate in oven set to its lowest setting for an hour or as needed.
② When the bread is stiff, cut and tear into small pieces and process in a food processor.
③ Sift the bread crumbs through a coarse sieve. Repeat steps ② and ③ as many times as needed to achieve desired amount.
● Cooking tips
・it’s convenient to store the finished Panko in the freezer
・for best results, use white, crustless bread (Shokupan, if you can find it locally)
・large bread crumbs remaining after sieving can be warmed in the microwave for a short time to dry, and then poured into a food processor again to break them into small pieces. when yusing the microwave, it's a good idea to check on it often as not to burn the bread.
224
views
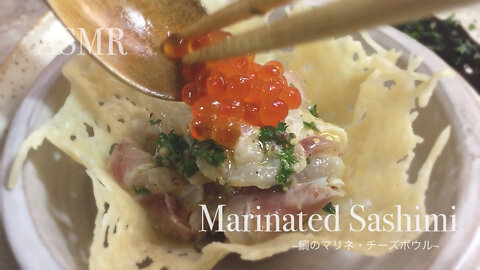
How To Make Marinated Sashimi In Parmesan Cheese Crisp Bowl
A Japanese Mom shows how to make a fancy Italian inspired dish. This dish, marinated sashimi seated inside a parmesan cheese crisp bowl, is super super easy despite the glamor. It’s irresistible paired with a balsamic vinegar reduction that's gorgeous on the plate, and you can also eat the cheese bowl!
There is no doubt that this beautiful dish will entertain guests for parties and special occasions.
● Ingredients (for 1~2 people)
・ Sea bream sashimi
・ Ikura
・ Dill
・ Shredded Parmesan cheese
+++ Marinade dressing +++
・ Olive Oil ... 2 tablespoons
・ Lemon Juice ... 1 teaspoon
・ Soy Sauce ... a few drops
・ Stone Ground Mustard ... 1 teaspoon
・ Chopped Parsley
・ Salt
・ Black Pepper
++ Balsamic reduction +++
・ Balsamic Vinegar ... 3 tablespoons
・ Soy Sauce ... 1 tablespoons
・ Sugar ... 1 teaspoon
● Recipe
① Place a round cut of parchment paper onto a frying pan, place 3 spoons of parmesan cheese in the center and spread it thinly.
② Place the frying pan over medium heat for about 3 minutes and when the cheese is fully melted and bubbling, remove it from the heat. Let it cool for 2~3 seconds, then place over an upside-down cup and shape into a bowl. Let rest until completely cooled.
③ Repeat ①&② to make the necessary amount of servings of Parmesan Cheese bowls.
④ Pour Balsamic Vinegar, Soy Sauce, and Sugar in a small pan and simmer until thickened and milder in taste.
⑤ Pour the Marinade Dressing ingredients in a bowl and mix.
⑥ Slice the Red Snapper Sashimi at an angle into thin slices, mix with dressing and marinade quickly.
⑦ Dress plate with prepared balsamic reduction and cheese bowl, place marinated sashimi in the bowl, and serve topped with dill and ikura.
● Cooking tips
・For toppings, Tobiko is a good substitute for Ikura & dill.
・When marinating sashimi, mix sashimi and dressing just before serving. Do not leave in the marinade dressing for too long.
89
views

Marinated Sea Beam Sashimi In Parmesan Crisp Bowl
A Japanese Mom shows how to make a fancy Italian inspired dish. This dish, marinated sashimi seated inside a parmesan cheese crisp bowl, is super super easy despite the glamor. It’s irresistible paired with a balsamic vinegar reduction that's gorgeous on the plate, and you can also eat the cheese bowl!
There is no doubt that this beautiful dish will entertain guests for parties and special occasions.
=============================================================
❥ Please subscribe our YouTube channel :
https://www.youtube.com/channel/UCDvC...
❥ Instagram : https://www.instagram.com/hungrycooki...
=============================================================
● Ingredients (for 1~2 people)
・ Sea bream sashimi
・ Ikura
・ Dill
・ Shredded Parmesan cheese
+++ Marinade dressing +++
・ Olive Oil ... 2 tablespoons
・ Lemon Juice ... 1 teaspoon
・ Soy Sauce ... a few drops
・ Stone Ground Mustard ... 1 teaspoon
・ Chopped Parsley
・ Salt
・ Black Pepper
++ Balsamic reduction +++
・ Balsamic Vinegar ... 3 tablespoons
・ Soy Sauce ... 1 tablespoons
・ Sugar ... 1 teaspoon
● Recipe
① Place a round cut of parchment paper onto a frying pan, place 3 spoons of parmesan cheese in the center and spread it thinly.
② Place the frying pan over medium heat for about 3 minutes and when the cheese is fully melted and bubbling, remove it from the heat. Let it cool for 2~3 seconds, then place over an upside-down cup and shape into a bowl. Let rest until completely cooled.
③ Repeat ①&② to make the necessary amount of servings of Parmesan Cheese bowls.
④ Pour Balsamic Vinegar, Soy Sauce, and Sugar in a small pan and simmer until thickened and milder in taste.
⑤ Pour the Marinade Dressing ingredients in a bowl and mix.
⑥ Slice the Red Snapper Sashimi at an angle into thin slices, mix with dressing and marinade quickly.
⑦ Dress plate with prepared balsamic reduction and cheese bowl, place marinated sashimi in the bowl, and serve topped with dill and ikura.
● Cooking tips
・For toppings, Tobiko is a good substitute for Ikura & dill.
・When marinating sashimi, mix sashimi and dressing just before serving. Do not leave in the marinade dressing for too long.
97
views
1
comment

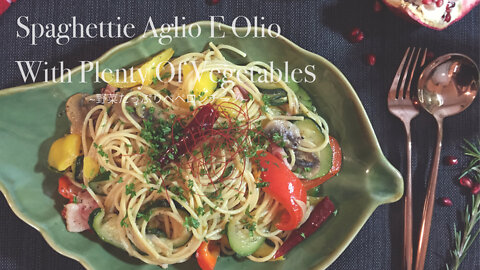
ASMR Cooking: Spaghetti Aglio E Olio (Peperoncino) - Tons of Veggies & Spicy Garlic Olive Oil
In Japan, we have a pasta dish called “Peperoncino Spaghetti”, which is an abbreviation for "Aglio, olio e peperoncino" in Italian. Essentially, it's a simple pasta made only with garlic, olive oil and red pepper. Because it is so simple, there are many ways to make it.
In this video, I'll show you a recipe I usually use for a late brunch, chocked full of bacon and healthy vegetables such as bell peppers, mushrooms, and zucchini. It's super easy and quick to make and is so delicious, so why not give it a try!
● Ingredients for 1~2 people
・Spaghetti… 100 ~ 200g
・Bacon ... 2 pieces
・Mushrooms ... 2-3 pieces
・Red bell pepper ... 1/4
・Yellow bell pepper ... 1/4
・Zucchini ... 1/3
・Parsley
・Garlic ... 2 ~ 4 pieces
・Dried red pepper ... 2
・Chicken consomme ... 1/2 tablespoon
・Herbes de Provence
・Olive oil
・Salt
・Black pepper
・Soy sauce ... a few drops
● Cooking Recipe
① Prepare hot water to boil spaghetti
② Slice one zucchini, three mushrooms, four cloves of garlic, and 1/2 a bell pepper. Remember to remove seeds from bell peppers. Mince Parsley. Slice bacon into bite sized pieces
③ Place olive oil, garlic, and dried red pepper into a frying pan. Place over low heat and slowly cook to draw out flavor.
④ When the garlic is aromatic, add prepped zucchini, red and yellow bell peppers, and cook.
⑤ When the vegetables are tender, add bacon and a pinch of Herbes de Provence.
⑥ When the water is boiling, boil the spaghetti. Boil for 1 minute shorter than the specified boiling time
⑦ Add 1 ~ 1 1/2 a cup of spaghetti water to the pan. Season with chicken consommé, salt, and black pepper, adding a few drops of soy sauce as a secret ingredient. Shake the frying pan to emulsify the oil and hot water well
⑧ When the pasta is ready, place in pan after step 7 and toss to mix. Taste test and if bland, season with salt and black pepper
⑨ Finally, pour olive oil Lin circular motions, shaking the pan again to emulsify the water and oil so it clings to the pasta
● Cooking tips
・You can do it without Herbes de Provence, but it's good if you have any dry herbs, such as oregano, basil, and rosemary
・Spaghetti is further cooked when mixed in with sauce, so boil it for 1 minute shorter than the specified time on the package it comes in
260
views
1
comment
Peperoncino Spaghetti: How to prepare this healthy & delicious pasta
In Japan, we have a pasta dish called “Peperoncino Spaghetti”, which is an abbreviation for "Aglio, olio e peperoncino" in Italian. Essentially, it's a simple pasta made only with garlic, olive oil and red pepper. Because it is so simple, there are many ways to make it.
In this video, I'll show you a recipe I usually use for a late brunch, chocked full of bacon and healthy vegetables such as bell peppers, mushrooms, and zucchini. It's super easy and quick to make and is so delicious, so why not give it a try!
● Ingredients for 1~2 people
・Spaghetti… 100 ~ 200g
・Bacon ... 2 pieces
・Mushrooms ... 2-3 pieces
・Red bell pepper ... 1/4
・Yellow bell pepper ... 1/4
・Zucchini ... 1/3
・Parsley
・Garlic ... 2 ~ 4 pieces
・Dried red pepper ... 2
・Chicken consomme ... 1/2 tablespoon
・Herbes de Provence
・Olive oil
・Salt
・Black pepper
・Soy sauce ... a few drops
● Cooking Recipe
① Prepare hot water to boil spaghetti
② Slice one zucchini, three mushrooms, four cloves of garlic, and 1/2 a bell pepper. Remember to remove seeds from bell peppers. Mince Parsley. Slice bacon into bite sized pieces
③ Place olive oil, garlic, and dried red pepper into a frying pan. Place over low heat and slowly cook to draw out flavor.
④ When the garlic is aromatic, add prepped zucchini, red and yellow bell peppers, and cook.
⑤ When the vegetables are tender, add bacon and a pinch of Herbes de Provence.
⑥ When the water is boiling, boil the spaghetti. Boil for 1 minute shorter than the specified boiling time
⑦ Add 1 ~ 1 1/2 a cup of spaghetti water to the pan. Season with chicken consommé, salt, and black pepper, adding a few drops of soy sauce as a secret ingredient. Shake the frying pan to emulsify the oil and hot water well
⑧ When the pasta is ready, place in pan after step 7 and toss to mix. Taste test and if bland, season with salt and black pepper
⑨ Finally, pour olive oil Lin circular motions, shaking the pan again to emulsify the water and oil so it clings to the pasta
● Cooking tips
・You can do it without Herbes de Provence, but it's good if you have any dry herbs, such as oregano, basil, and rosemary
・Spaghetti is further cooked when mixed in with sauce, so boil it for 1 minute shorter than the specified time on the package it comes in
55
views
1
comment

Temarizushi recipes: How to make colorful ball shaped sushi
This video will show you step-by-step how to make a traditional colorful and cute version of sushi called Temarizushi (Temari Sushi). It’s wonderful as a bite-sized gift, or as a centerpiece for a party or celebration where people gather at the table.
You can play with various combinations to make unique and interesting tastes and appearances. Have fun with friends or family making these beautiful Temari and make it an event!
=============================================================
❥ Follow us on YouTube :
https://www.youtube.com/channel/UCDvC...
❥ Instagram : https://www.instagram.com/hungrycooki...
=============================================================
● Ingredients (for 2 people)
・ Rice… 360ml
・ Water ... 400 ml
・ Kelp
・ Rice vinegar ... 3 tablespoons
・ Sugar ... 2 tablespoons
・ Salt ... 1 teaspoon
・ Tobiko (Flying fish roe) ... 1 tablespoon
* Please arrange the ingredients and toppings as you like.
The combination of ingredients used in the video is as follows
・ Tuna sashimi + Kaiware (Radish sprouts)
・ Shrimp + Oba (Shiso Leaves)
・ Red Snapper sashimi + Lemon + Chives
・ Squid sashimi + Sea urchin + Oba (Shiso Leaves)
・ Salmon sashimi +Dill + Salmon roe
・ Eggs + Kaiware (Radish sprouts)
・ Avocado + Mayonnaise + Tobiko
・ Cucumber + Salmon roe + Tobiko
・ Radish + Umeboshi + Tobiko
● Cooking Recipe
① Put rice in a bowl and after washing the rice 3 with water changes, drain the water, add fresh water and let it soak for about 30 minutes to 1 hour.
② After soaking the rice in water, drain it with a colander and put it in a clay pot, add 400 ml of water, and add a piece of kelp.
③ Cover and heat over high heat, and when bubbles come out from the lid after about 7~10 minutes, reduce the heat to low and cook for 15 minutes.
Just before turning off the fire, turn on high heat for about 5 seconds, then turn off the heat, and steam for 10 to 15 minutes.
④ Mix rice vinegar, sugar and salt well to make sushi vinegar.
⑤ Put the cooked rice in a large bowl and cool it while mixing it with sushi vinegar.
⑥ Prepare your favorite ingredients
+++Tuna and radish sprouts+++
Cut the tuna into thin slices and cut the radish sprouts to a suitable length for toppings.
+++Shrimp and perilla+++
Boil the shrimp in salt water lightly and cut open the middle.
Shred the perilla for toppings
+++Bream and Lemon+++
Slice the Bream and make a slice of Lemon for toppings
+++Squid and Oba, sea urchin topping+++
Slice the squid and cut Oba half vertically.
Prepare sea urchin for toppings
+++Salmon and Ikura (salmon roe), dill topping+++
Slice the salmon and prepare Ikura, dill for toppings.
+++Egg wrap+++
Make usuyaki tamago (a thin omelette), take a mold with a small cup and cut it into a round shape.
Use sushi rice mixed with tobiko
+++Avocado mayonnaise and tobiko toppings+++
Slice the avocado and prepare mayonnaise and tobiko for toppings.
+++Cucumber, Salmon roe topping+++
Cut the cucumber in half and make thin slices with a peeler.
After slicing, soak it in salt water to soften it.
Salmon roe for toppings
Use sushi rice mixed with tobiko
+++Radish, Umeboshi topping+++
Slice the radish and soak it in salt water to soften it.
Umeboshi for toppings
Use sushi rice mixed with tobiko
⑦ Take the Sushi rice in another bowl about 1/3, add the tobiko and mix.
⑧ Place each material on the wrap, put vinegared rice about the size of a golf ball on it, and squeeze it lightly to make a ball.
⑨ Leave the ball in wrap for a while until the ingredients and sushi rice stick together.
⑩ After taking it out of the wrap, decorate it with toppings and it's done.
● Cooking tips
・ Since the clay pot absorbs water, do not use it when soaking the rice in water. Use the bowl that was used when washing to soak rice in the water.
・ When squeezing the wrap to make a ball, squeeze it softly
・ You can enjoy the remaining ingredients making chirashizushi or sashimi salad the next day.
249
views
2
comments

Hearty vegetable soup: Simple & easy nutritious dinner for days
The word “Hearty” is perfect for this vegetable soup! A simple soup that takes its homey flavor from plenty of veggies and bacon, seasoned with chicken consommé, Herbes de Provence, and other herbs. The taste is rich and gentle and can be eaten days in a row without getting tired of it. It’s perfect for a main or side dish, or healthy snack.
Depending on the amount of water used, cooking time, and the way you crush the vegetables, you can enjoy different finished textures of the soup. Find the texture that suits you best. You can also enjoy various changes depending on your mood and situation.
=============================================================
❥ Follow us on YouTube :
https://www.youtube.com/channel/UCDvC...
❥ Instagram : https://www.instagram.com/hungrycooki...
=============================================================
************TIME MENU LINKS HERE*******************
● Ingredients
・Onion … 1
・Carrot … 1
・Mushroom … 2
・Potato … 1
・Celery … 2
・Cabbage … 1/4~1/2
・Asparagus … 3
・Parsley
・Bay leaf
・Bacon … 3~4
・Herb mix
・Chicken consomme … 1/2~1spoon
・Salt
・Black pepper
・Olive oil
● Recipe
① Cut onions, potatoes and celery into bite-sized pieces, cut carrots into small pieces, chop asparagus, slice mushrooms, chop cabbage into bite-sized pieces by hand, and chop parsley.
② Cut bacon into bite-sized pieces
③ Warm the frying pan, add olive oil when it gets hot, and fry the onions, celery, carrots, mushrooms, and asparagus.
④ When the vegetables are tender, add bacon and fry a little more.
⑤ When ④ is cooked, transfer it to a pan, and add potatoes, water, bay leaf, and make it to boil over high heat.
⑥ When it boils, scoop up the floating forms, add chicken consomme, herb mix, salt and black pepper, and add cabbage.
⑦ Reduce the heat to low heat, cover and simmer for 30 minutes to 1 hour until the vegetables are tender.
⑧ When the vegetables are soft, lightly crush the potatoes with the back of a ladle to add richness to the soup.
Adjust the amount of crushing according to how much richness you like to add to the soup.
⑨ Check the taste and season with salt, black pepper and consomme.
Sprinkle chopped parsley and mix the whole.
⑩ If possible, let the soup sit overnight so that the taste gets well blended and the flavor is deepened.
⑪ Serve on a soup plate and sprinkle with parsley.
● Cooking tips
・Frying vegetables well until onion get slightly brown will give soup a deep flavor.
・After adding the bacon, just fry it lightly and turn off the heat.
・If you like spicy, it's delicious to shake a little crushed read pepper at the end.
185
views

【ASMR NO MUSIC】★Ginger Chicken Liver★ Easy Healthy Snack, Great With Rice And Sake!
You can easily make a delicious snack simmered in sweet and spicy ginger broth, so healthy they’re basically natural supplements. Chicken liver is a food that is packed with rich nutrients, such as vitamin A (necessary for eye health), iron (effective in preventing anemia), and zinc (important for maintaining immune function). It also has a strong antioxidant effect, so it is good for anti-aging as well.
It is softer and has less calories than beef and pork and is appealing to even people who don’t usually enjoy liver. However, even if it is super delicious, vitamin A has an upper limit per day and can cause illness in high concentrations, so we recommend that you enjoy it once a week as an occasional snack.
● Ingredients (for 2 people)
・ Chicken liver & heart ... About 300g
・ Ginger… 1 knob
・ Soy sauce ... 50ml
・ Sake ... 100ml
・ Water ... 50ml
・ Sugar ... 2 tablespoons
・ Honey ... 1 tablespoons
・ Shredded red pepper
● Recipe
① Remove the fat from the heart and slice partway through the middle. Cut the liver into bite-sized pieces. If there is a blood clot, remove it
② Drop the liver and hearts in a bowl filled with plenty of water, and gently rub without damaging the liver. Change the water 2-3 times and rub well.
③ Soak in a bowl under running water for about 30 minutes to drain remianing blood.
④ After 30 minutes drain the water and place the meat over a paper towel to remove excess water. However, do not leave it on the paper too long as it will harden the meat.
⑤ Julienne the ginger and set aside about 2 pinches for garnish.
⑥ Pour soy sauce, water, sake, sugar, honey and shredded ginger into a pot and boil.
⑦ When the sauce has come to a boil, add liver and hearts and simmer for 3-4 minutes. If scum rises, remove it with a clean spoon or hand sieve.
⑧ After simmering, remove the liver and hearts and begin evaporating water from the broth.
⑨ When the water in the pot is low, put the liver and hearts back in and simmer over med-high heat to remove the remaining water.
⑩ When the broth has thicken into a glaze, remove from heat and serve. Use shredded ginger and shredded red pepper to garnish.
● Cooking tips
・ Chicken liver that has been well blooded is plump and delicious.
・ When removing water from the hearts and liver over kitchen paper, do not leave it for too long. It will harden the meat.
85
views

How to make ginger soy sauce chicken liver
You can easily make a delicious snack simmered in sweet and spicy ginger broth, so healthy they’re basically natural supplements. Chicken liver is a food that is packed with rich nutrients, such as vitamin A (necessary for eye health), iron (effective in preventing anemia), and zinc (important for maintaining immune function). It also has a strong antioxidant effect, so it is good for anti-aging as well.
It is softer and has less calories than beef and pork and is appealing to even people who don’t usually enjoy liver. However, even if it is super delicious, vitamin A has an upper limit per day and can cause illness in high concentrations, so we recommend that you enjoy it once a week as an occasional snack.
=============================================================
❥ Please subscribe us on YouTube :
https://www.youtube.com/channel/UCDvC...
❥ Instagram : https://www.instagram.com/hungrycooki...
=============================================================
● Ingredients (for 2 people)
・ Chicken liver & heart ... About 300g
・ Ginger… 1 knob
・ Soy sauce ... 50ml
・ Sake ... 100ml
・ Water ... 50ml
・ Sugar ... 2 tablespoons
・ Honey ... 1 tablespoons
・ Shredded red pepper
● Recipe
① Remove the fat from the heart and slice partway through the middle. Cut the liver into bite-sized pieces. If there is a blood clot, remove it
② Drop the liver and hearts in a bowl filled with plenty of water, and gently rub without damaging the liver. Change the water 2-3 times and rub well.
③ Soak in a bowl under running water for about 30 minutes to drain remianing blood.
④ After 30 minutes drain the water and place the meat over a paper towel to remove excess water. However, do not leave it on the paper too long as it will harden the meat.
⑤ Julienne the ginger and set aside about 2 pinches for garnish.
⑥ Pour soy sauce, water, sake, sugar, honey and shredded ginger into a pot and boil.
⑦ When the sauce has come to a boil, add liver and hearts and simmer for 3-4 minutes. If scum rises, remove it with a clean spoon or hand sieve.
⑧ After simmering, remove the liver and hearts and begin evaporating water from the broth.
⑨ When the water in the pot is low, put the liver and hearts back in and simmer over med-high heat to remove the remaining water.
⑩ When the broth has thicken into a glaze, remove from heat and serve. Use shredded ginger and shredded red pepper to garnish.
● Cooking tips
・ Chicken liver that has been well blooded is plump and delicious.
・ When removing water from the hearts and liver over kitchen paper, do not leave it for too long. It will harden the meat.
142
views
8
comments